




How to Install Windows 11 Pro: The Complete Step-by-Step Guide

On this page
- Is This a Clean Install, a Reinstall, or an Upgrade?
- Before You Install Windows 11 Pro
- Step 1: Download Windows 11 From Microsoft
- Step 2: Create a Bootable Windows 11 USB Drive
- Step 3: Boot Your Computer From the USB Drive
- Windows 11 Pro Installation — Screen by Screen
- Windows 11 First-Time Setup (OOBE)
- How to Verify Windows 11 Pro Was Installed Correctly
- How to Activate Windows 11 Pro
- Common Edition Situations
- After Installation: Windows Update
- After Installation: Drivers
- Common Windows 11 Pro Installation Problems
- Frequently Asked Questions
- Where to Get a Genuine Windows 11 Pro Product Key
Windows 11 Pro is Microsoft's business-and-power-user edition of Windows 11 — it includes everything in Windows 11 Home plus features like BitLocker device encryption, Remote Desktop (as a host), Hyper-V virtualization, Group Policy management, and the ability to join a Windows domain or Microsoft Entra ID. This guide walks you through installing it from scratch, whether you're setting up a brand-new PC, doing a clean install to start fresh, or reinstalling Windows 11 Pro after a hardware upgrade.
This tutorial is written for beginners. If you've never created a bootable USB drive or sat through a Windows Setup screen before, you're in the right place — every step is explained, including the technical terms (BIOS, UEFI, ISO, TPM, and partitions) that other guides tend to assume you already know.
Who this guide is for: anyone installing Windows 11 Pro on a PC they own — a new build, a used PC, a PC currently running Windows 10 or Windows 11 Home, or a PC you're wiping and reinstalling from scratch.
Clean install vs. upgrade vs. reinstall — which one are you doing? We cover this in the next section, because it changes a few of the steps you'll take.
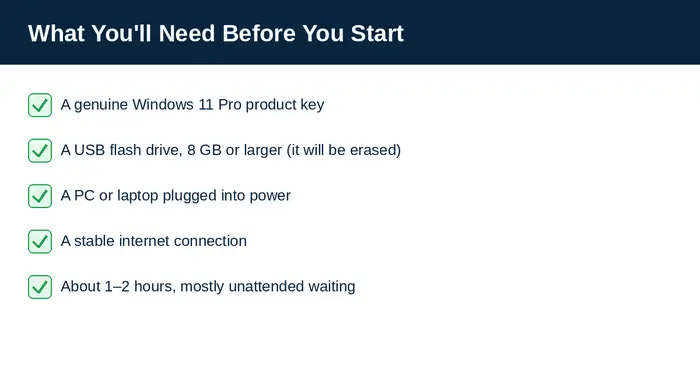
What you'll need before you start:
- A Windows 11 Pro product key (or an existing digital license tied to your Microsoft account, if you're reinstalling on the same PC)
- A blank USB flash drive, 8 GB or larger
- A PC or laptop plugged into power (never do this on battery alone)
- A stable internet connection
- About 1–2 hours, most of which is unattended waiting
If you still need a legitimate Windows 11 Pro product key, you can pick one up before starting — you'll need it either during setup or right after, at the activation step.
Is This a Clean Install, a Reinstall, or an Upgrade?
These three scenarios use the same Windows Setup software but take slightly different paths:
- Clean install — you're wiping a drive completely and installing Windows 11 Pro from nothing (a new SSD, a PC you want to fully reset, or a drive you're formatting on purpose). This is the scenario this guide focuses on in the most detail, since it's the one where mistakes (like deleting the wrong partition) are most costly.
- Reinstall — you already had Windows 11 Pro activated on this exact PC before, and you're putting it back after wiping the drive. Your product key may already be tied to your hardware, so Windows can often reactivate automatically once you're back online and signed in — see the activation section below.
- In-place upgrade — you're running Windows 10 or an earlier build of Windows 11 and want to move to Windows 11 Pro without erasing your files. For that, you run Setup from inside Windows (the Installation Assistant, or setup.exe from a mounted ISO) instead of booting from the USB drive — booting from USB always performs a clean install.
If you're specifically upgrading from Windows 11 Home to Pro on a PC that's already set up, you don't need to reinstall anything at all — jump straight to Upgrading an existing Windows 11 Home PC to Pro further down.
1. Back Up Your Files
A clean install erases everything on the target drive, including personal files, installed programs, and settings. Before doing anything else, copy anything important — documents, photos, project files — to an external drive, a second internal drive, or a cloud service. This step is easy to skip when you're in a hurry, and it's the one step you can't undo afterward.
2. Check Windows 11 System Requirements
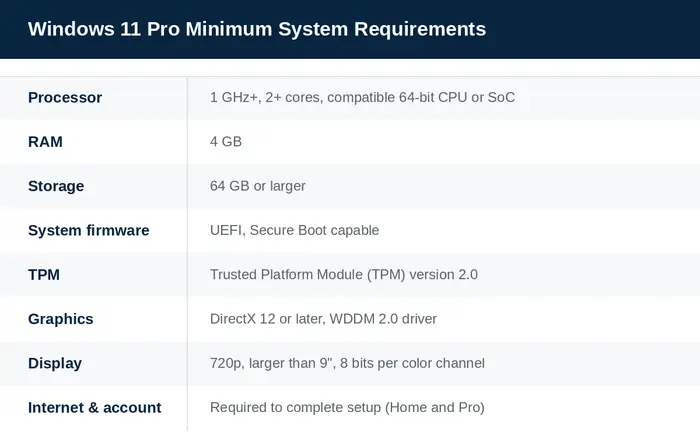
These are Microsoft's official minimum requirements, current as of this guide's last review:
| Component | Minimum requirement |
|---|---|
| Processor | 1 GHz or faster, 2 or more cores, on a compatible 64-bit processor or System on a Chip (SoC) |
| RAM | 4 GB |
| Storage | 64 GB or larger drive |
| System firmware | UEFI, Secure Boot capable |
| TPM | Trusted Platform Module (TPM) version 2.0 |
| Graphics card | Compatible with DirectX 12 or later, WDDM 2.0 driver |
| Display | High definition (720p), greater than 9" diagonally, 8 bits per color channel |
| Internet & account | Internet connection and a Microsoft account are required to complete setup, for both Home and Pro editions |
Windows 11 only runs on 64-bit hardware. If you're not sure what any of these terms mean, don't worry — the PC Health Check app below will check all of this for you automatically and tell you in plain language whether your PC qualifies.
Two terms worth understanding before you continue:
- UEFI is the modern replacement for the old BIOS — it's the firmware that starts your PC before Windows loads, and it's what lets your PC boot from a USB drive.
- TPM (Trusted Platform Module) is a small security chip (or a firmware-based equivalent) that stores encryption keys. Most PCs made since around 2016 have one, but it's sometimes switched off by default in the UEFI settings — see the troubleshooting section if Setup says it can't find one.
3. Check Your Current Windows Edition and Build
If you're currently running Windows, go to Settings → System → About and look under "Windows specifications." This tells you your current edition (Home, Pro, etc.), version, and build number — useful to know before you start, especially if you're upgrading rather than doing a clean install.
4. Run the PC Health Check App
Microsoft's free PC Health Check app checks your specific PC against the Windows 11 requirements above and tells you exactly what's missing if it's not compatible (for example, "TPM 2.0 is not currently detected"). Download it only from Microsoft's official site.
5. Windows 11 Home vs. Windows 11 Pro — Which Are You Installing?
Both editions install from the same media and meet the same hardware requirements — the difference is licensing and features, not installation difficulty. Windows 11 Pro adds:
- BitLocker drive encryption
- Remote Desktop (as the host you connect *to*, not just as a client)
- Hyper-V virtualization
- Group Policy Editor
- The ability to join a Windows domain or Microsoft Entra ID (Azure AD)
- Windows Update for Business deferral controls
Make sure the product key or license you have is specifically for Windows 11 Pro — a Home key will not unlock Pro features, and a Pro key won't install on a PC where Setup has already locked in the Home edition without going through the proper upgrade path (more on this in the edition scenarios section).
6. What You'll Need on Hand
- A blank USB flash drive, 8 GB or larger (everything on it will be erased)
- Your Windows 11 Pro product key, if you have one already
- The PC plugged into power — never install an OS on battery power alone
- A stable internet connection for downloading roughly 5 GB and for the setup process itself
Step 1: Download Windows 11 From Microsoft (Official Source Only)
Only ever download Windows 11 installation files from microsoft.com. Third-party "Windows 11 ISO download" sites are a common source of modified, tampered, or malware-laden installers. MMKeys does not host or link to unofficial Windows ISOs anywhere on this site.
Your 3 official options
Microsoft offers three legitimate ways to get Windows 11, all from the same official download page:
- Windows 11 Installation Assistant — for upgrading the PC you're currently using in place, keeping your files and apps. Best if you're not doing a clean install.
- Create Windows 11 Installation Media (the Media Creation Tool) — downloads Windows 11 and builds a bootable USB flash drive (or ISO file) you can use to install on this PC or another one. Best for clean installs.
- Download Windows 11 Disk Image (ISO) — downloads just the raw ISO file, which you can then burn to USB yourself using a tool like Rufus, mount in a virtual machine, or burn to DVD.
Which method this guide uses, and why
This guide uses option 2, the Media Creation Tool, because it's the most beginner-friendly path to a clean install: it downloads Windows 11 and builds your bootable USB in one guided tool, with no extra software required. If you already have experience with disk-imaging tools and prefer working directly with the ISO file, we cover Rufus as an alternative method in the next section — but it isn't necessary for the standard installation path this guide follows.
Step 2: Create a Bootable Windows 11 USB Drive
USB drive requirements
- At least 8 GB of free space. Anything smaller won't fit the installation files.
- All existing data on the drive will be erased. Back up anything on the USB first.
- A USB 3.0 drive will noticeably speed up both the creation process and the installation itself, though USB 2.0 works fine too.
Creating the media with the Media Creation Tool
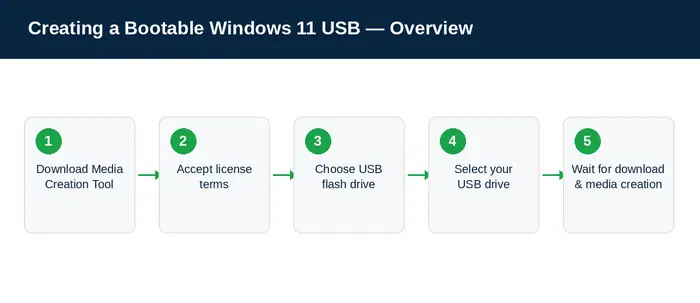
- On the official Windows 11 download page, under "Create Windows 11 Installation Media," select Download Now to get `MediaCreationTool.exe`.
- Run the downloaded file. Windows may show a security prompt asking if you want to allow the app to make changes — select Yes.
- Accept the license terms.
- On the language and edition screen, if you're creating media for the PC you're currently using, you can leave "Use the recommended options for this PC" checked. If you're building media for a *different* PC, uncheck this box and choose the language and edition (Windows 11) manually.
- Choose USB flash drive as the media type.
- Select your USB drive from the list of removable drives. Double-check you've picked the correct one — again, everything on it will be erased.
- The tool will download Windows 11 (typically 4–6 GB) and then copy the installation files to your USB drive. This step depends heavily on your internet speed — budget 15–45 minutes.
- When you see "Your USB flash drive is ready," you're done. Close the tool.
Alternative: using the ISO file directly (Rufus)
If you downloaded the raw ISO file instead (option 3 above) rather than using the Media Creation Tool, you'll need a separate tool to turn it into bootable media. Rufus is a well-known, free, open-source tool for this. This is an alternative path, not a requirement — most beginners should stick with the Media Creation Tool above, which handles both the download and the USB creation in one step.
If you do use Rufus: select your USB drive, select the downloaded Windows 11 ISO as the boot selection, leave the partition scheme on GPT (for UEFI systems, which is what modern PCs use), and select Start. Rufus will warn you that all data on the drive will be destroyed — confirm to continue.
Step 3: Boot Your Computer From the USB Drive
Insert the USB and restart
Plug the bootable USB drive into the PC you're installing Windows 11 Pro on, then restart the computer.
Open the boot menu (not the BIOS)
As soon as the PC restarts, you need to press a specific key to open the boot menu — a short list of devices you can start from (your hard drive, the USB drive, etc.). This is different from the full BIOS/UEFI settings menu, though the key to reach each is sometimes shared.
The correct key varies by PC manufacturer and even by model. Watch your screen carefully during the first few seconds after restart — most PCs briefly display a message like "Press F12 for boot menu." If you miss it, just restart and try again.
Common boot menu keys by manufacturer
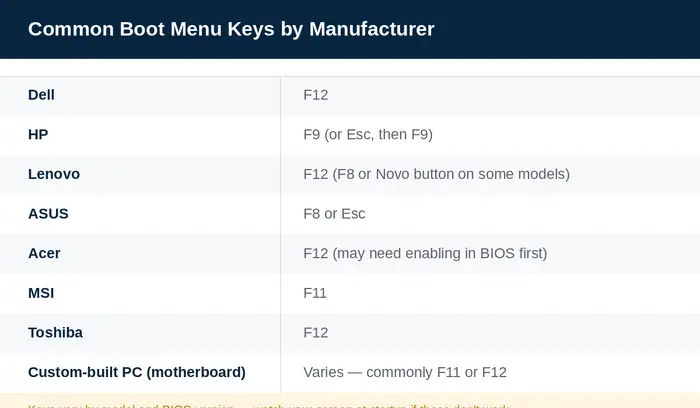
| Manufacturer | Common boot menu key(s) |
|---|---|
| Dell | F12 |
| HP | F9 (Esc then F9 on some models) |
| Lenovo | F12 (F8 or Novo button on some models) |
| ASUS | F8 or Esc |
| Acer | F12 (may need to be enabled in BIOS first) |
| MSI | F11 |
| Toshiba | F12 |
| Custom-built PC (motherboard brands) | Varies by motherboard — check the manufacturer's site (common: F11 for ASUS/Gigabyte/MSI boards, F12 for others) |
These are the most commonly reported keys as of this writing, but manufacturers do change them across models and BIOS versions — if none of these work, check your specific model's support page or look for the on-screen prompt at startup.
Boot menu vs. BIOS/UEFI settings
The boot menu is a temporary, one-time list of devices to start from — you pick your USB drive once, and next time the PC restarts normally without asking again. The BIOS/UEFI settings menu is a persistent configuration screen (usually opened with Del or F2) where you can permanently change the boot order, enable/disable Secure Boot, and enable/disable TPM. You generally only need the boot menu for this installation — the full UEFI settings only come into play if something isn't working (see the troubleshooting section).
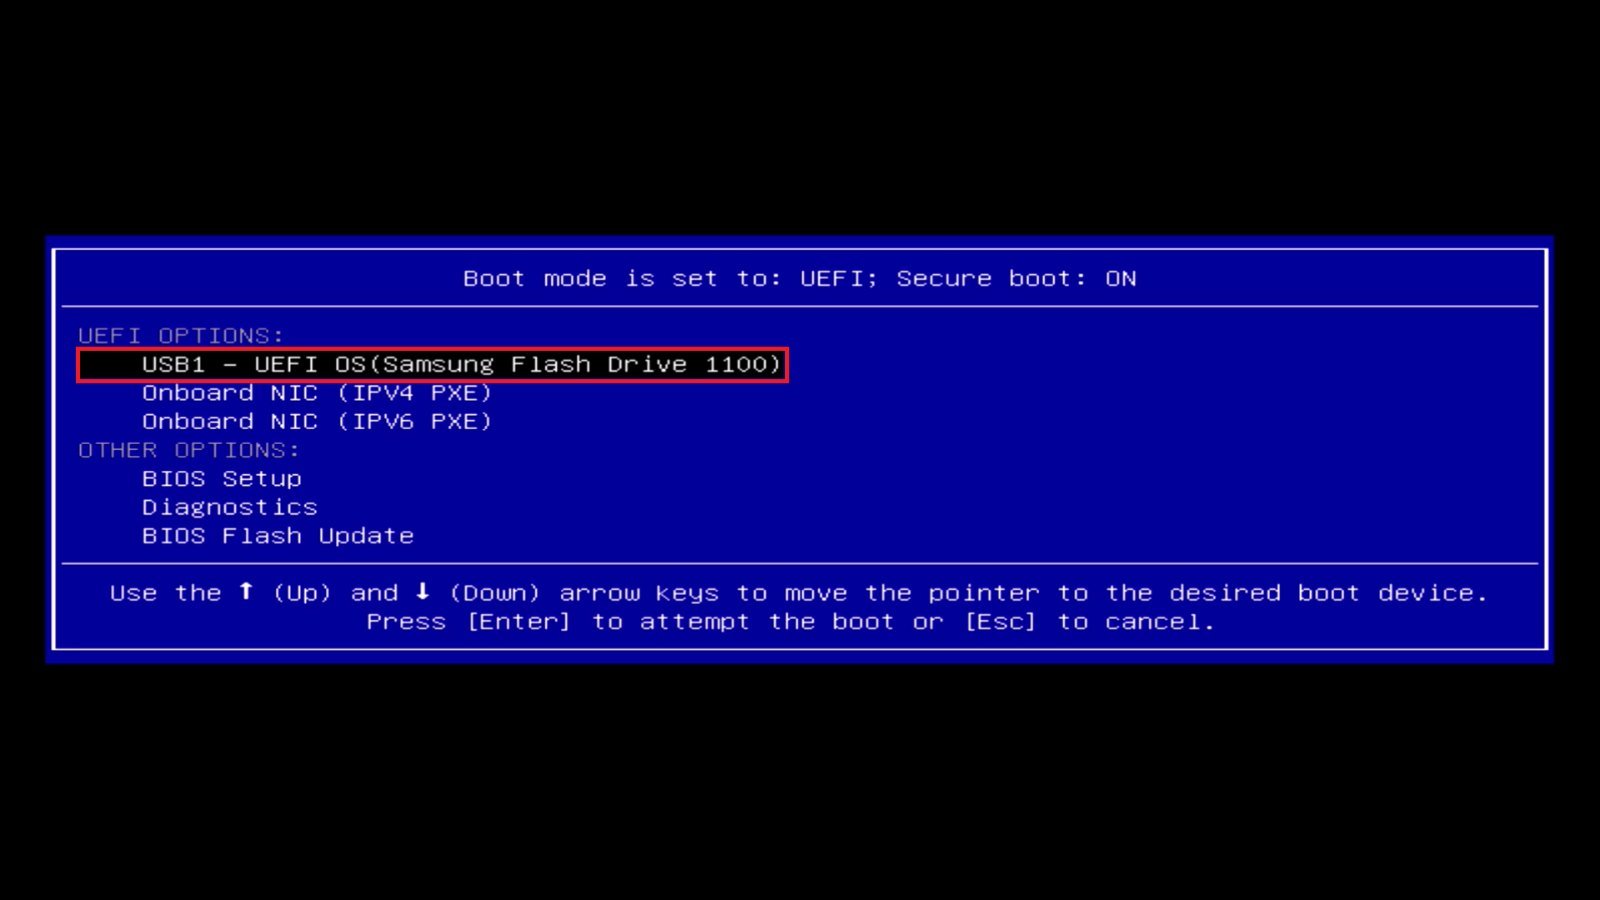
When your USB drive appears in the boot menu, look for an entry prefixed with "UEFI:" — selecting the UEFI version (rather than a plain, non-UEFI entry) ensures Windows 11 installs correctly for modern systems.
Windows 11 Pro Installation — Screen by Screen
This is the core of the installation. Follow each screen in order — we won't skip anything, even steps that feel obvious.
Microsoft redesigned Windows Setup in 2024. If you created your USB drive recently with the Media Creation Tool, you'll see the light-grey screens shown below. Older installation media shows the previous dark-blue "Install now" style of Setup — the choices are the same, only the look and the order of one or two screens differ.
Step 1 — Windows Setup Loads
After selecting your USB drive in the boot menu, you'll see a black screen with the Windows logo for a few moments while Setup loads. This is normal and can take a minute.
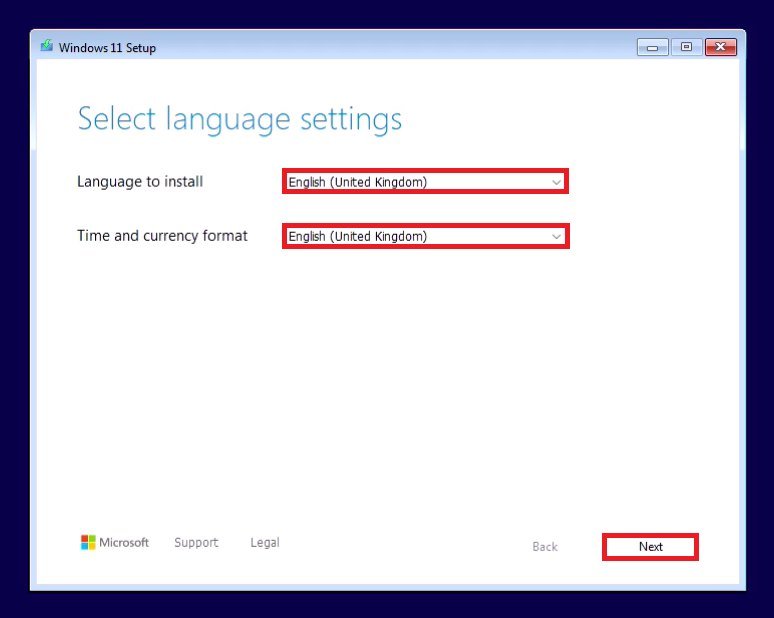
Step 2 — Select Language Settings
What you'll see: A window titled "Windows 11 Setup" with two dropdowns: Language to install and Time and currency format.
Action: Choose your language and region (for example, English (United States) or English (Canada)), then select Next.
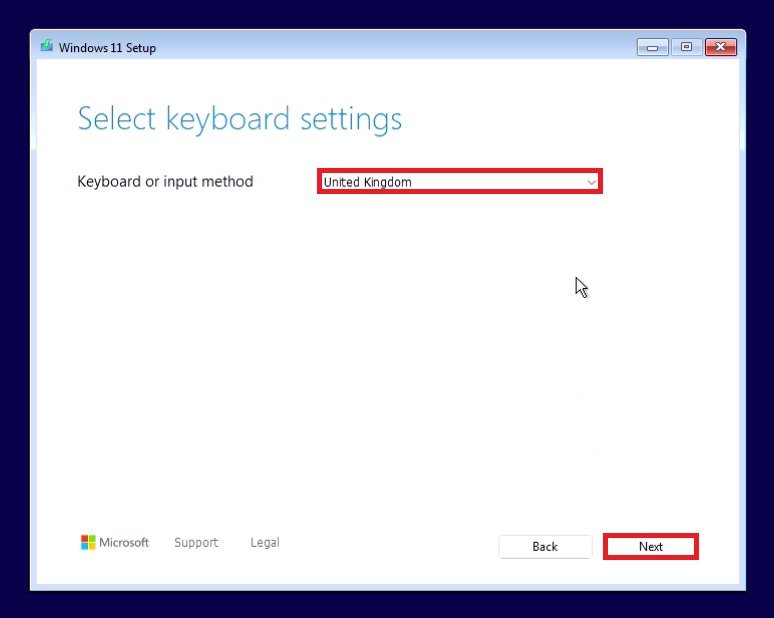
Step 3 — Select Keyboard Settings
What you'll see: A single dropdown for Keyboard or input method (for example, US).
Action: Leave the default unless you use a different physical keyboard layout, then select Next.
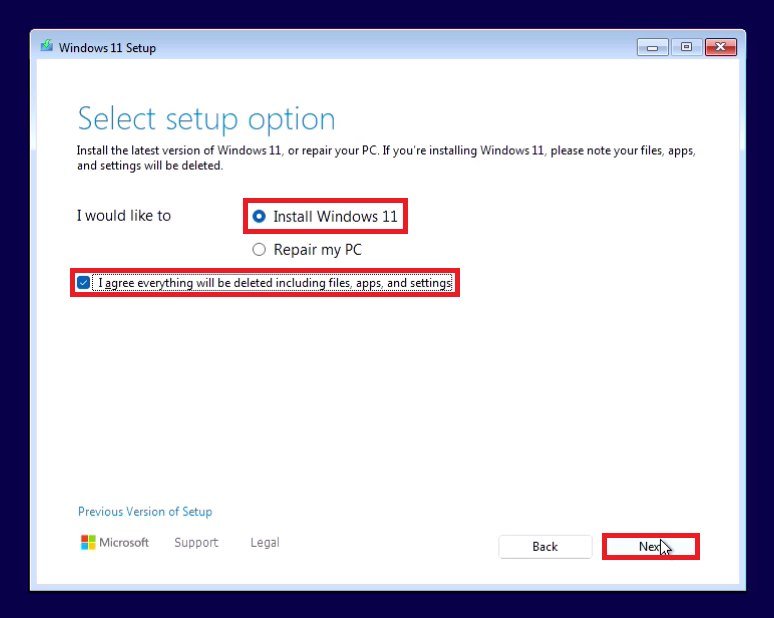
Step 4 — Select Setup Option: Install Windows 11
What you'll see: Two choices — Install Windows 11 and Repair my PC — plus a checkbox reading "I agree everything will be deleted including files, apps, and settings."
Action: Select Install Windows 11, tick the checkbox, then select Next. (This replaces the old "Install now" button and the old "Upgrade or Custom" choice — booting from USB always performs a clean install, which is why Setup asks you to confirm that everything on the target drive will be erased.)
Setup then shows "We're getting a few things ready" and "Checking your PC" for a few seconds while it verifies the hardware requirements.
Step 5 — Product Key Screen
What you'll see: A screen asking you to enter your product key, with a link reading "I don't have a product key."
Action:
- If you have a genuine 25-character Windows 11 Pro key, enter it now.
- If you don't have one yet, select I don't have a product key. You can enter it after installation is complete, in Settings.
IMPORTANT: Entering a key here (or skipping it) determines which edition installs, in combination with the next step. If you skip the key and the installer offers an edition list (Step 6), make sure you specifically select Windows 11 Pro.
On many brand-name PCs this screen never appears: Setup finds the product key stored in the PC's firmware (the key the manufacturer used) and installs that edition automatically. If the PC came with Windows Home, it will install Home — you can then upgrade to Pro afterwards with your Pro key, as covered in the Home-to-Pro section below.
Step 6 — Select Image (Choosing Windows 11 Pro)
What you'll see: A screen titled "Select image" listing the editions on the installation media (Windows 11 Home, Windows 11 Pro, Windows 11 Education, and so on). It only appears if you skipped the product key and no key was found in the firmware.
Action: Select Windows 11 Pro, then Next.
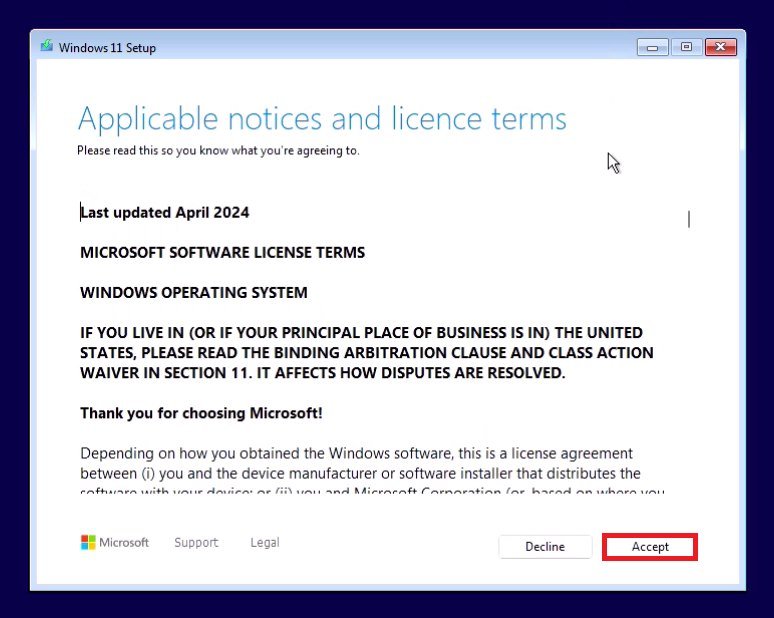
Step 7 — Applicable Notices and License Terms
What you'll see: The Microsoft Software License Terms.
Action: Read the terms, then select Accept.
Step 8 — Select Location to Install Windows 11 (Drive Selection)
What you'll see: Setup searches for disks for a moment, then lists every drive and partition detected on your PC, with a row of buttons above the list: Refresh, Load driver, Create Partition, Format, Extend and Delete Partition.
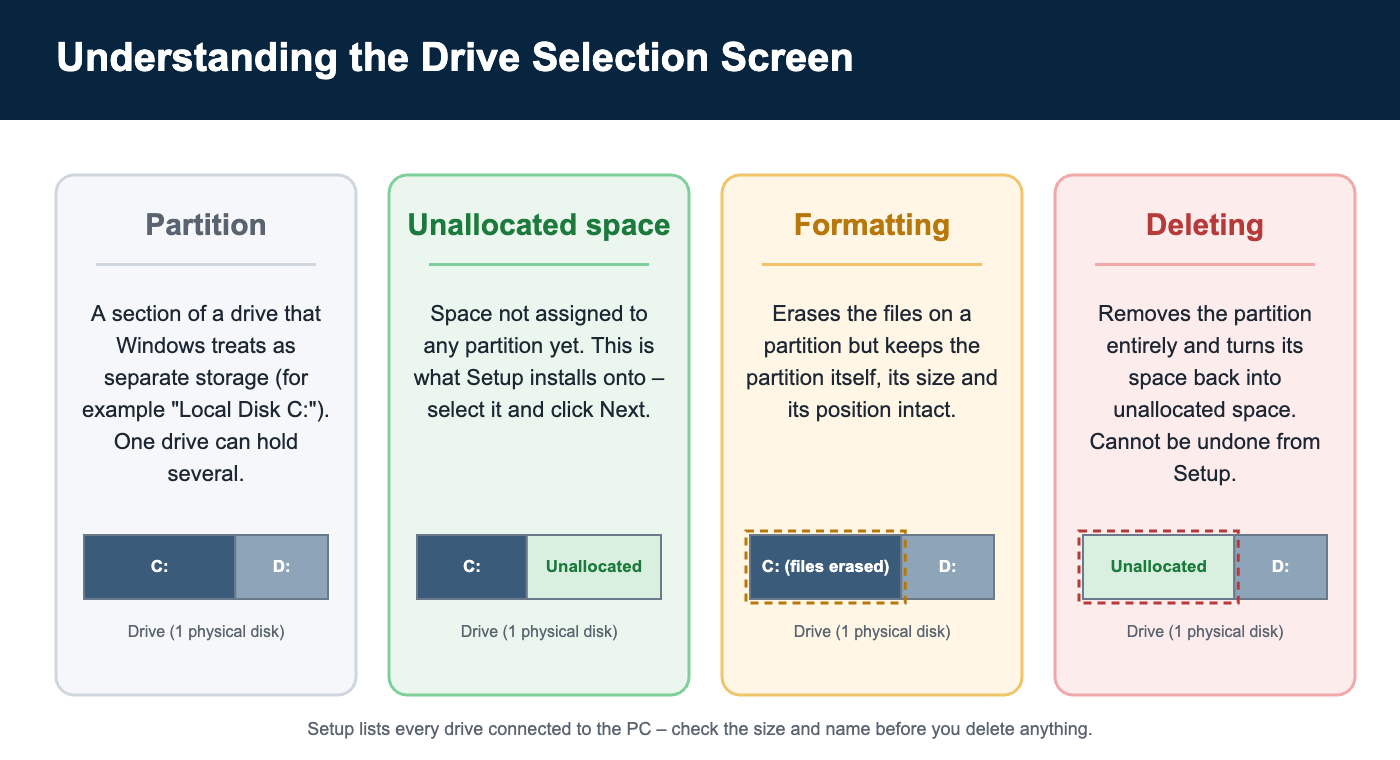
WARNING — read this before clicking anything on this screen. This is the step where mistakes cause permanent data loss. Understand these four concepts before proceeding:
- Partition — a section of a physical drive that Windows treats as a separate storage area (like "Local Disk C:"). A single physical drive can have multiple partitions.
- Unallocated space — space on a drive that isn't assigned to any partition yet. This is what Setup needs to install onto; it will create the partitions it needs automatically if you select unallocated space.
- Formatting a partition erases its files but keeps the partition itself intact (its size and position on the drive don't change).
- Deleting a partition removes it entirely, turning its space back into unallocated space — this deletes the files on it and cannot be undone from within Setup.
What to do depends on your situation:
- Brand-new, empty drive: you'll typically see one block of unallocated space. Select it and click Next — Setup will automatically create the partitions it needs.
- Drive with an existing Windows installation you want to replace, and you're absolutely certain there's nothing on it you need: select each partition belonging to that old installation and click Delete Partition, one at a time, until you're left with unallocated space, then select that unallocated space and click Next.
- You're not sure, or the drive has multiple partitions and you don't recognize all of them: stop here. Go back and back up any files you might need, or consult someone before deleting anything. Do not delete every partition on a drive "just to be safe" — some of those partitions may belong to a different drive entirely if your PC has more than one installed, and this screen lists all drives connected to the PC, not just the one you intend to wipe.
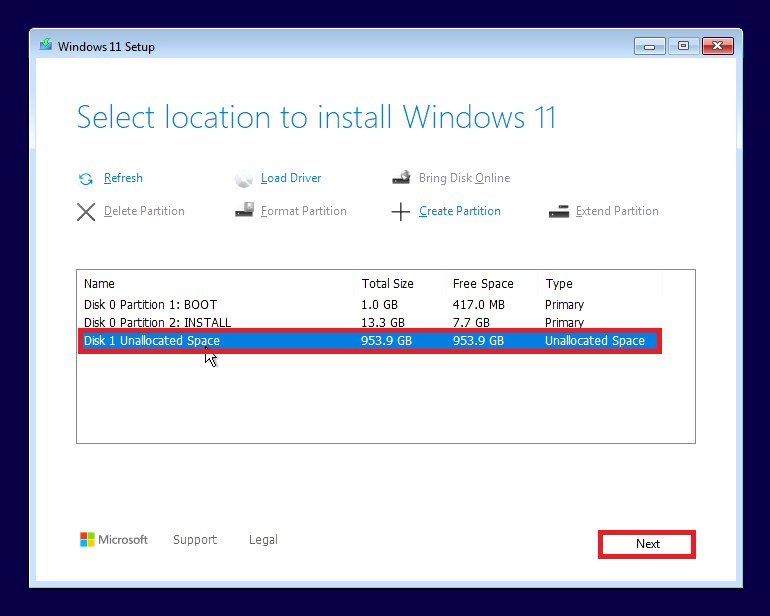
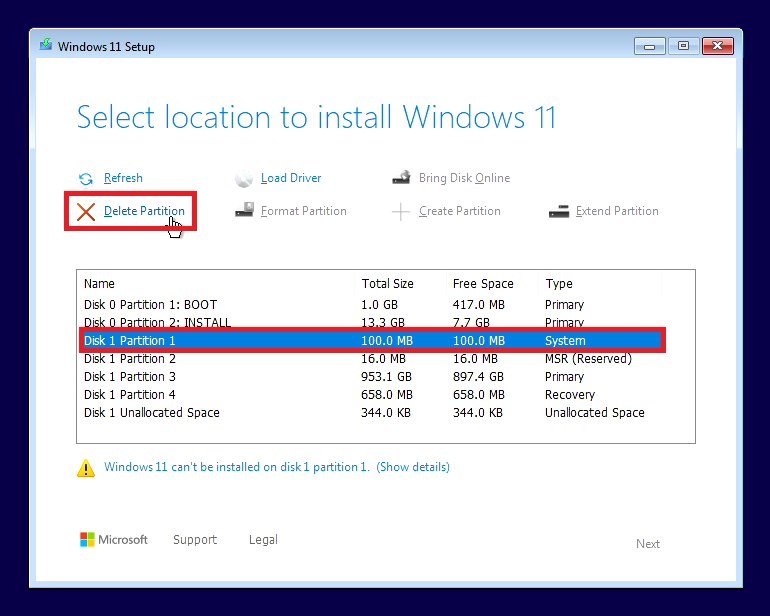
If Setup doesn't detect your drive at all on this screen, see "Setup can't see your SSD/hard drive" in the troubleshooting section below — this usually means a storage driver needs to be loaded with the Load driver button.
Step 9 — Ready to Install
What you'll see: A summary screen showing the edition that will be installed and the drive it will be installed on.
Action: Check that the edition reads Windows 11 Pro (if you chose it) and the drive is the one you intended, then select Install. This is the last chance to go back before the drive is written.
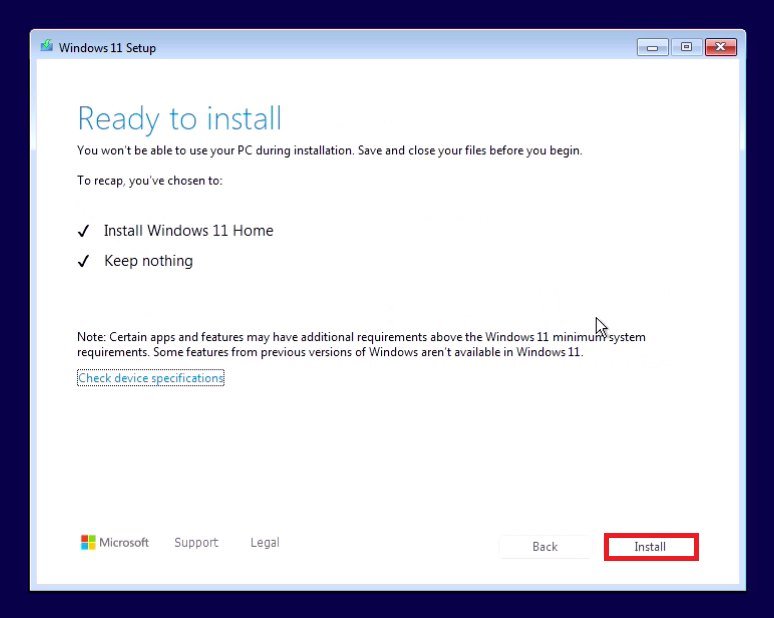
Step 10 — Installing Windows 11 (Copying Files and Restarts)
What you'll see: A blue "Installing Windows 11" screen that works through "Getting files ready for installation," "Installing features," "Installing updates," and "Finishing up," with a percentage counter.
Action: Nothing — just wait. This typically takes 20–45 minutes depending on your drive speed (an SSD is significantly faster than a mechanical hard drive) and PC performance.
The PC will restart automatically several times during this process. This is normal and expected — don't interrupt it.
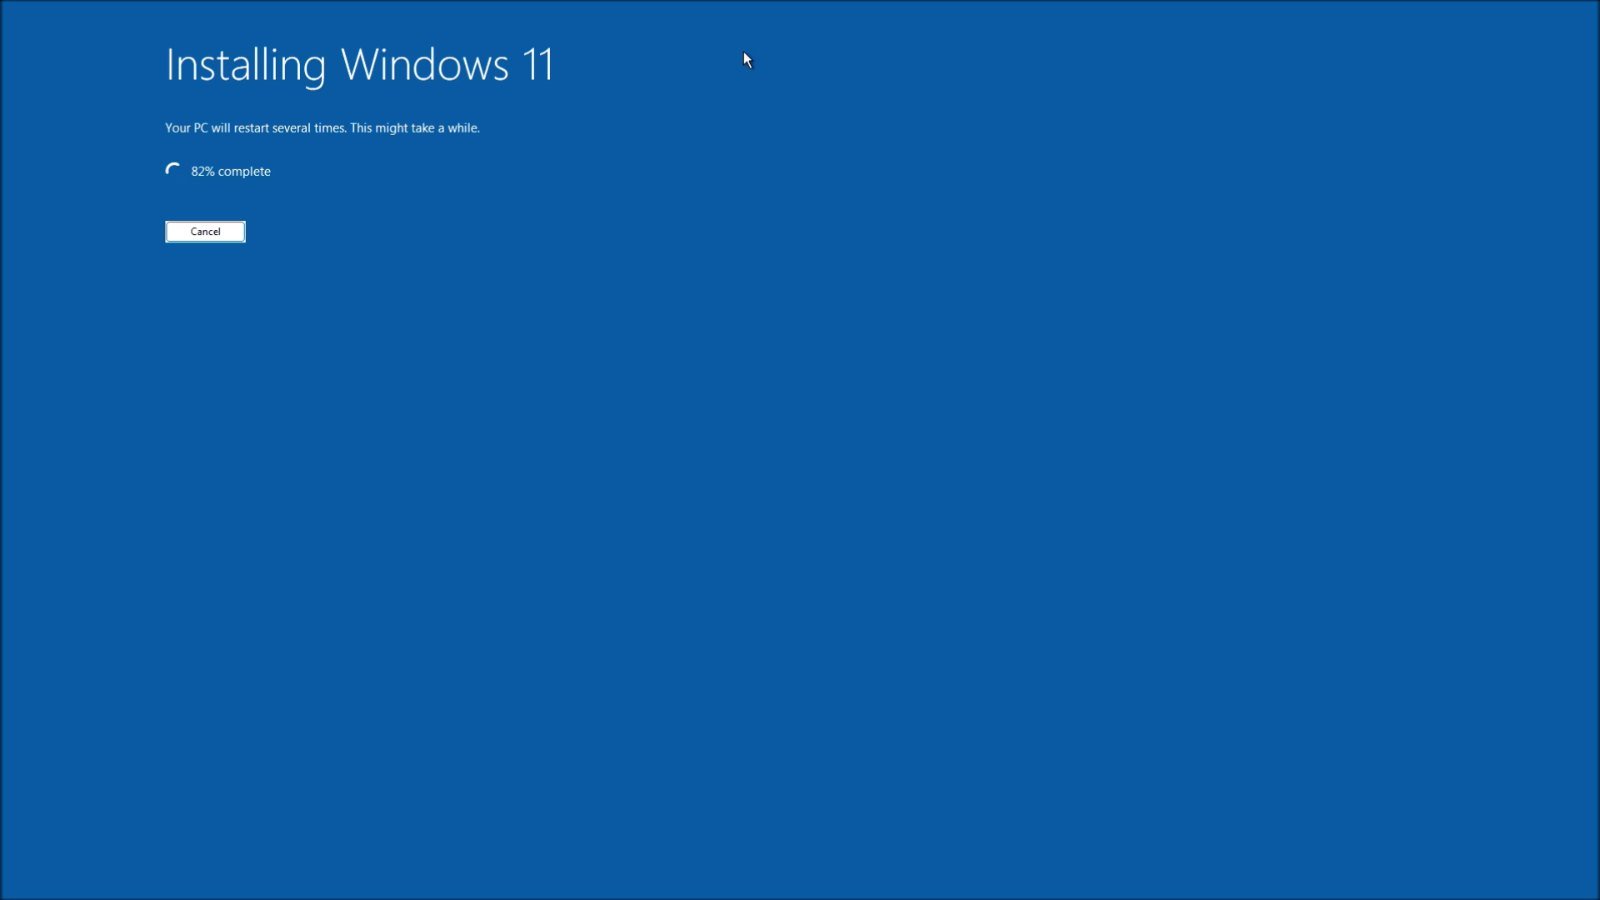
Step 11 — Remove the USB Drive at the Right Moment
After the first automatic restart, watch for the boot menu or a "Press any key to boot from USB" prompt. If it appears, do not press a key — let it time out and continue booting from the internal drive instead. If your PC is configured to always prioritize USB in its boot order, you may need to physically remove the USB drive after the first restart to prevent Setup from starting over from the beginning (this is a common cause of the "installation loop" issue covered in troubleshooting).
Windows 11 First-Time Setup (OOBE)
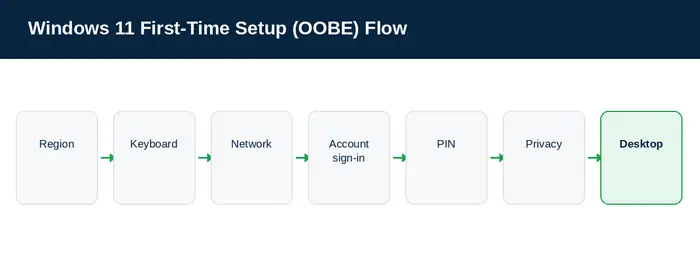
Once Windows finishes installing, you'll reach the Out-of-Box Experience (OOBE) — the first-run setup wizard. Microsoft updates this flow periodically, so the exact screens, their order, and their exact wording can vary slightly depending on your Windows 11 build, your region, and whether you're setting up Home or Pro. The sequence below reflects the current standard flow; if a screen looks slightly different on your PC, the underlying steps are the same.
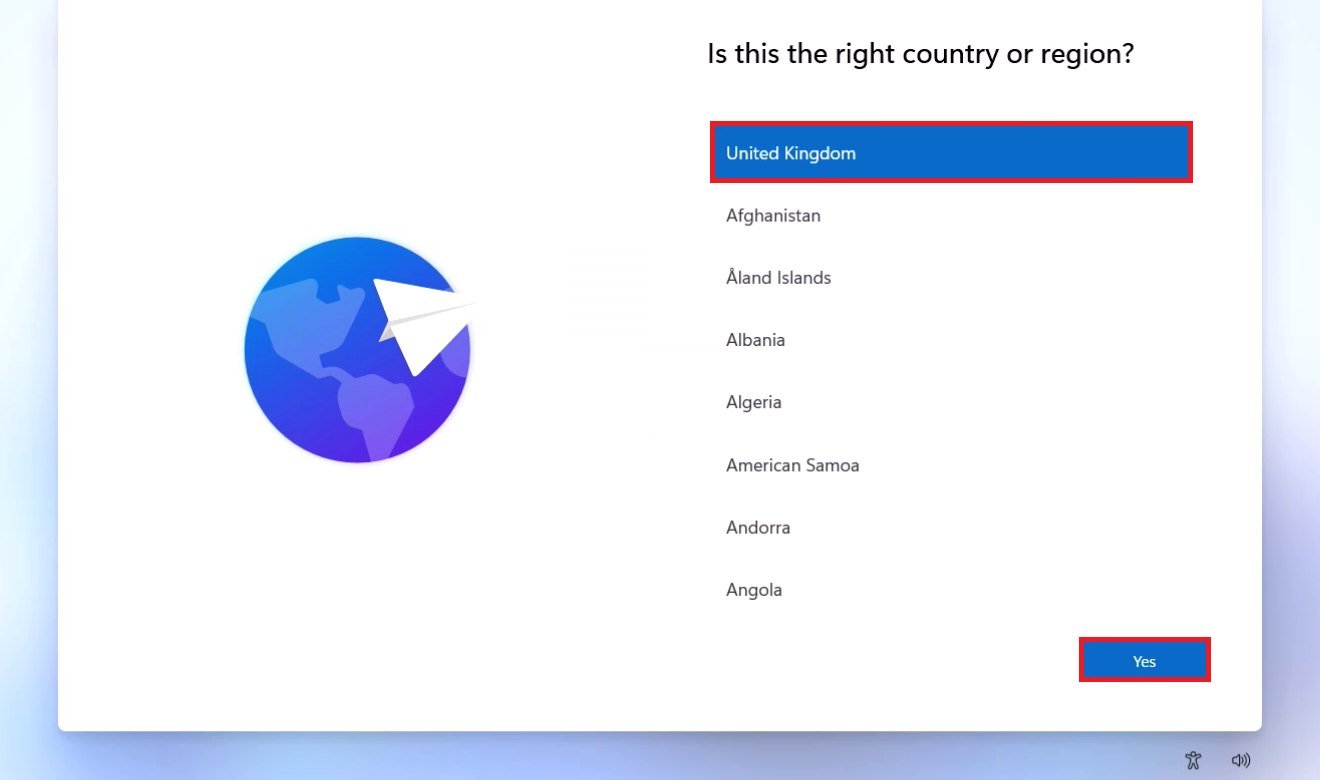
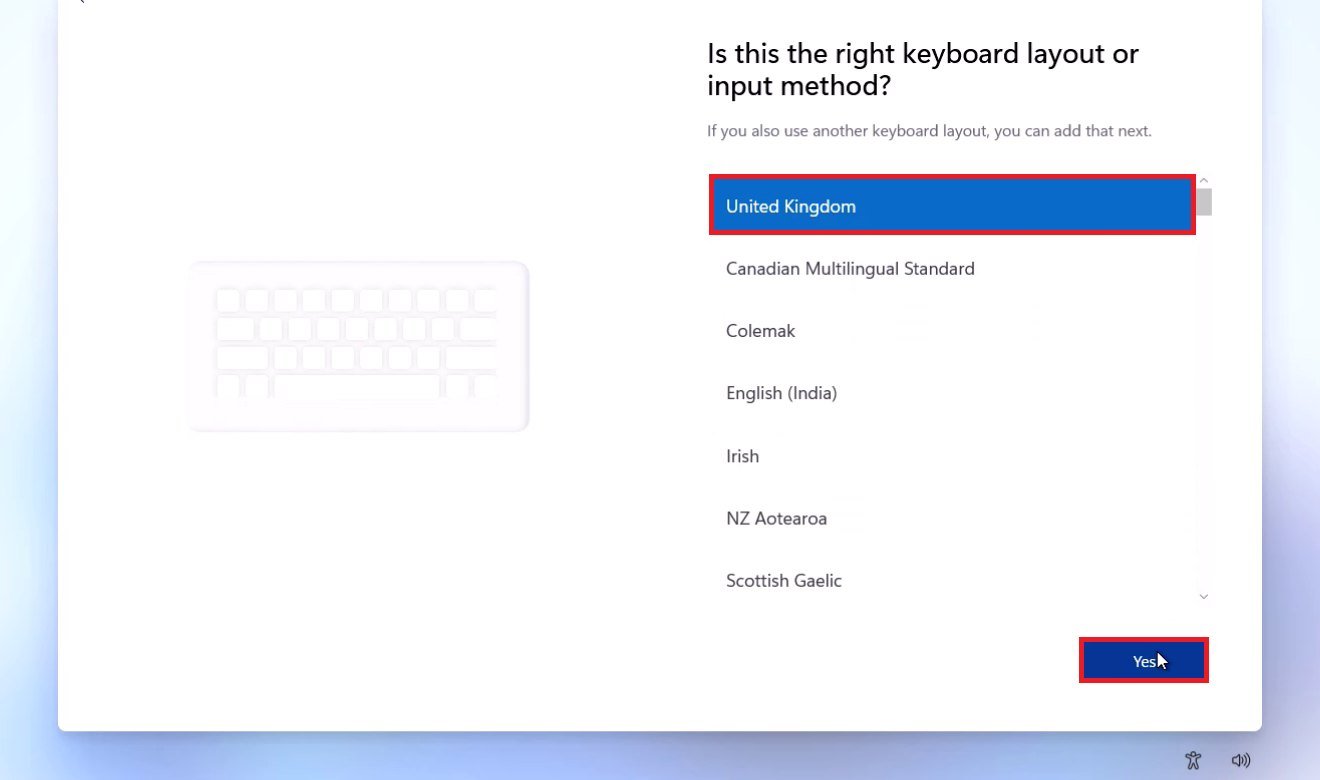
Region and keyboard layout
Confirm your country/region, then your keyboard layout. You'll be offered the option to add a second keyboard layout — skip this unless you actually use a second layout.
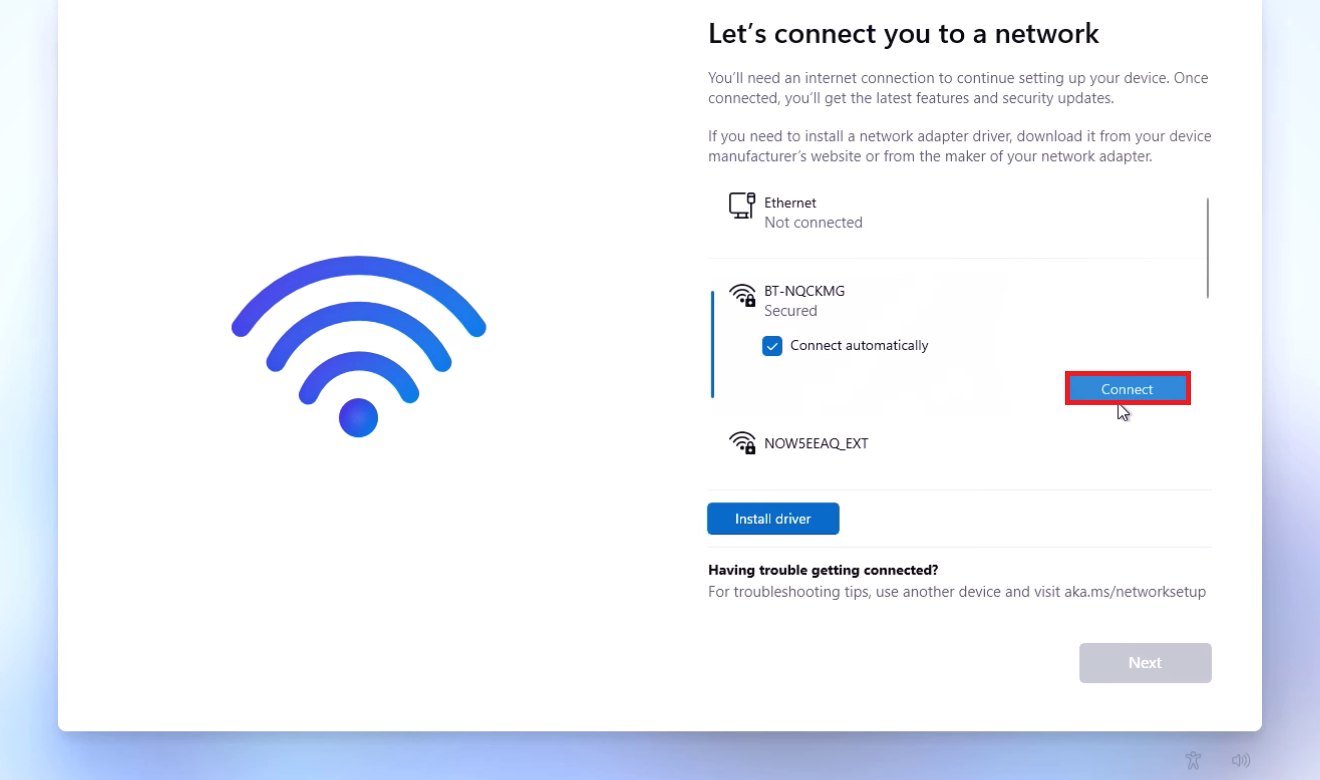
Network connection
Connect to Wi-Fi (select your network and enter the password) or, if you're using a wired connection, this may complete automatically. As of the current Windows 11 setup flow, an internet connection is required to continue setup on both Home and Pro editions — there is no standard, officially supported "skip" option on this screen.
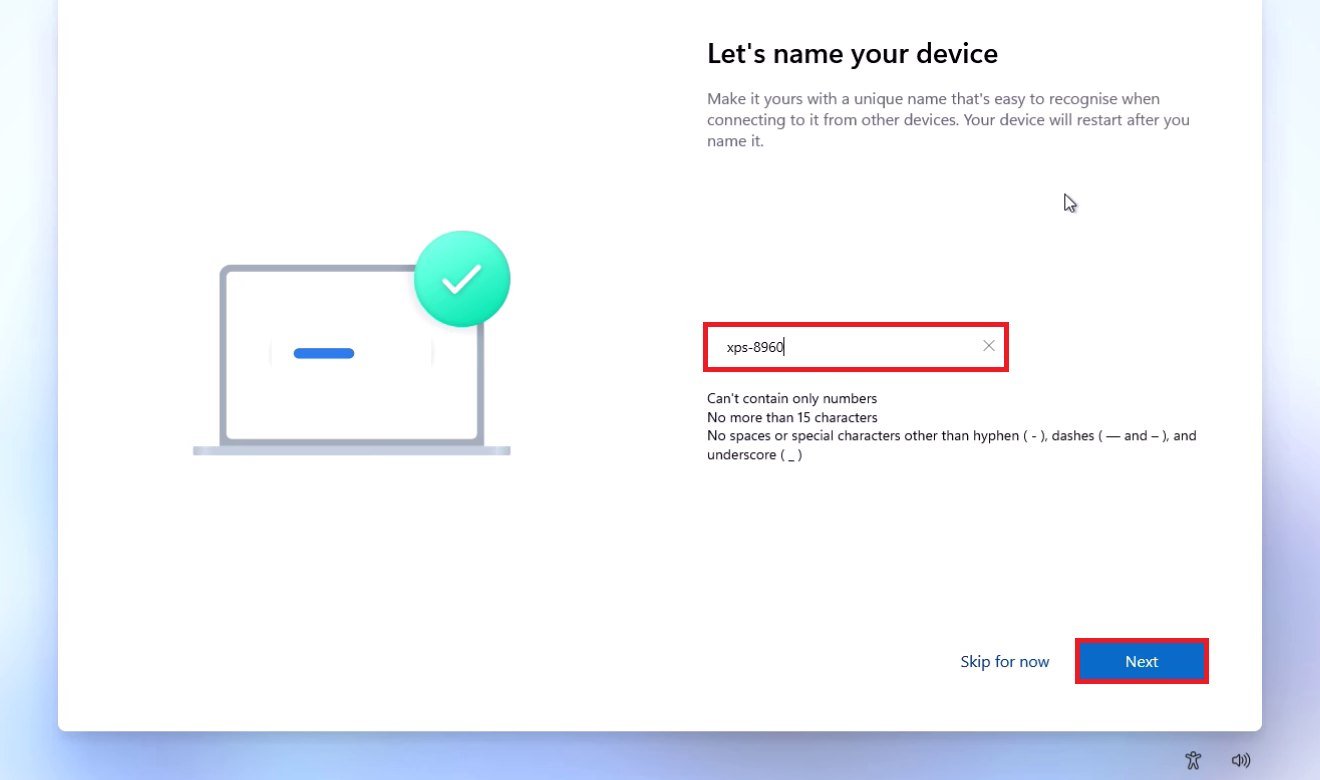
Windows then checks for updates for a minute or two, and may ask you to name your device — type a short name (letters and numbers, no spaces) or select Skip for now.
Account sign-in
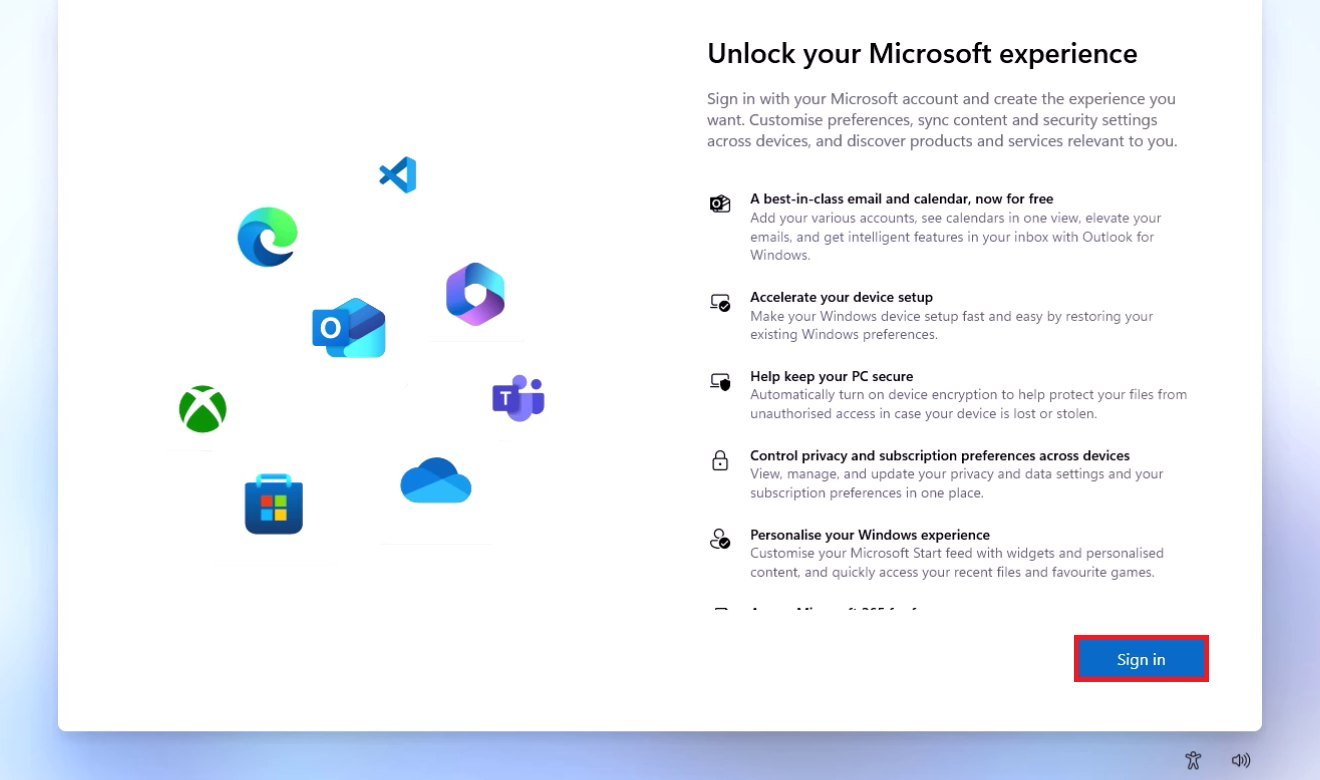
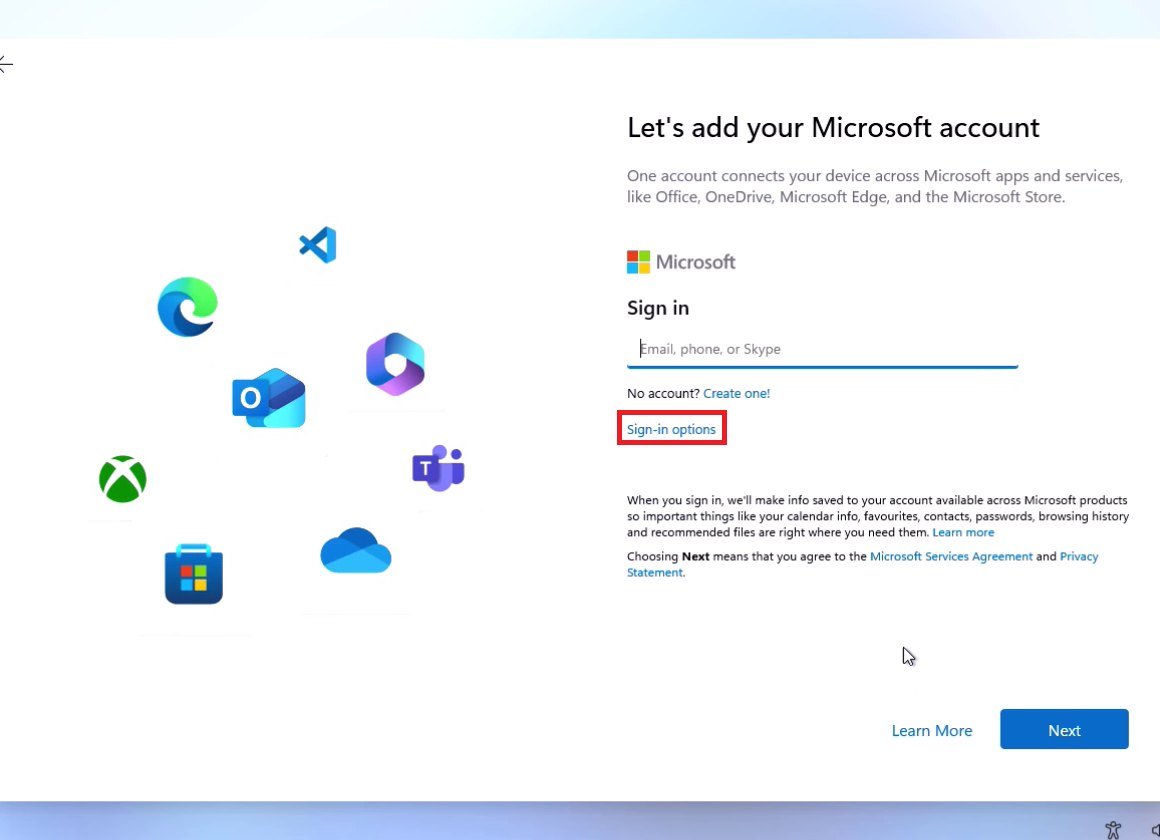
You'll be prompted to sign in with a Microsoft account, or create one if you don't have one. Select Sign in, enter the email address for your Microsoft account, then your password (and any verification code Microsoft sends you).
Windows 11 Pro's organization/domain sign-in option
This is one of the real differences between Home and Pro during setup: on Windows 11 Pro, you may see a screen asking "How would you like to set up this device?" with options for "Set up for personal use" and "Set up for an organization." Choosing the organization path lets you sign in with a work/school (Microsoft Entra ID) account or join a traditional Windows domain instead of a personal Microsoft account — this is a genuine, Microsoft-documented capability specific to Pro (and above) editions, intended for business and IT-managed deployments rather than personal use.
For a personal PC, "Set up for personal use" with a personal Microsoft account is the standard path, and it's the one this guide assumes from here on. Various unofficial workarounds for skipping the Microsoft account requirement on a personal setup circulate online; Microsoft has closed most of them over time and does not officially support them, so we don't recommend relying on any of them — they can change or stop working without notice.
PIN and security setup
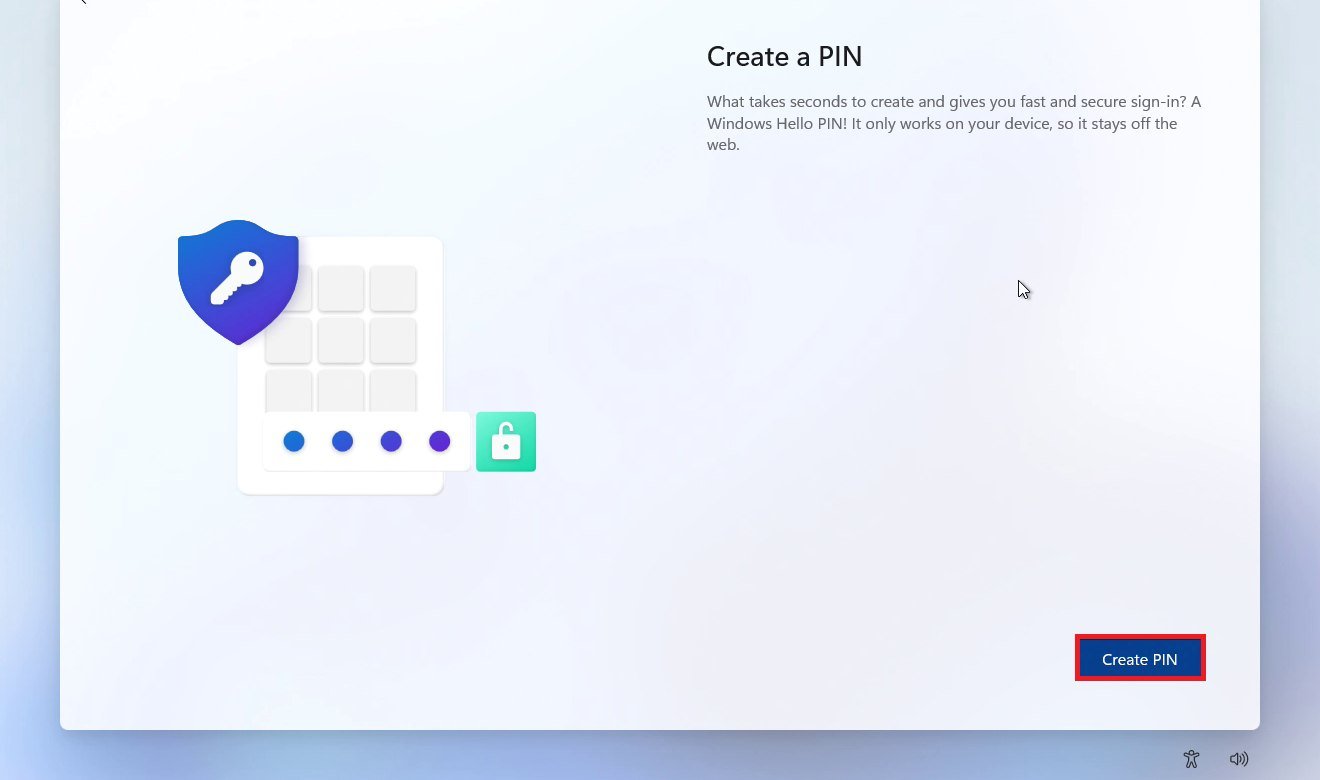
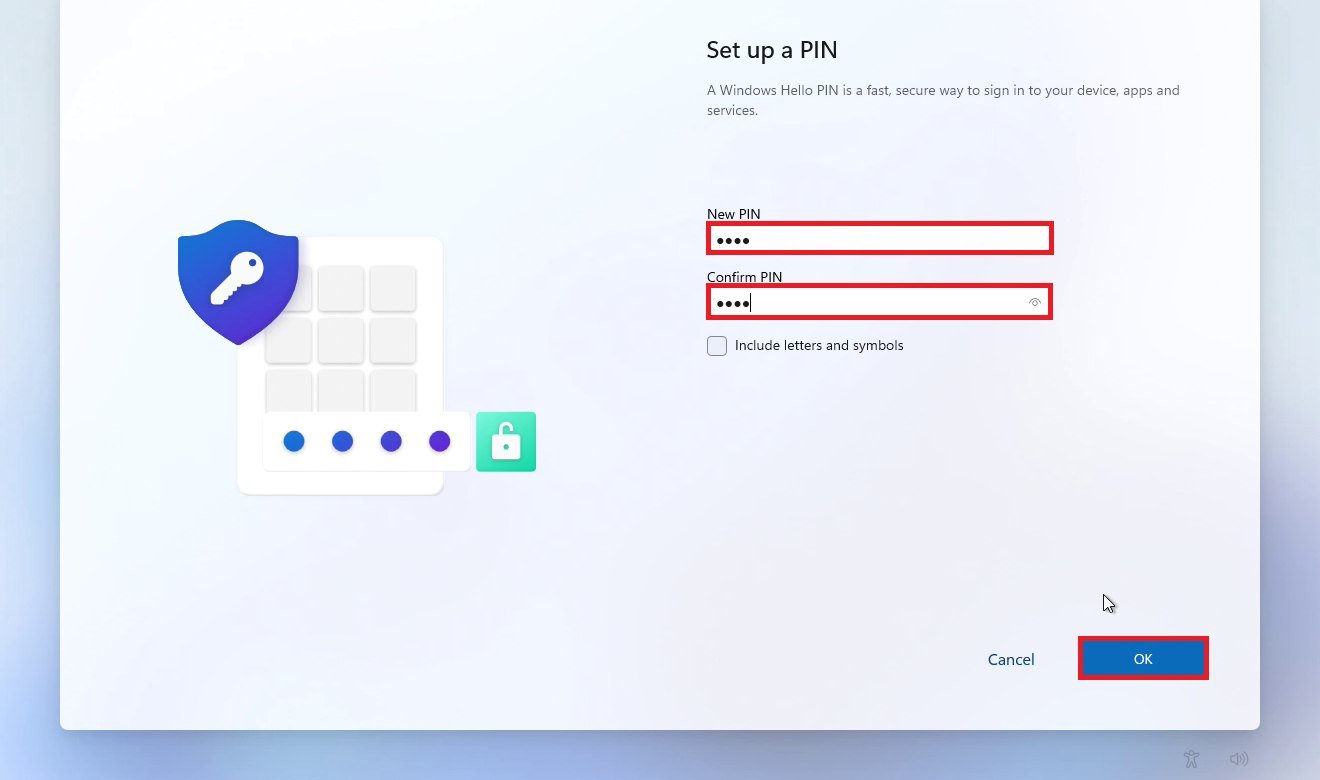
You'll be prompted to create a PIN (a 4+ digit or alphanumeric code tied to this specific device) for faster sign-in than typing your full Microsoft account password each time. Select Create PIN, enter the PIN twice, then OK.
Privacy settings
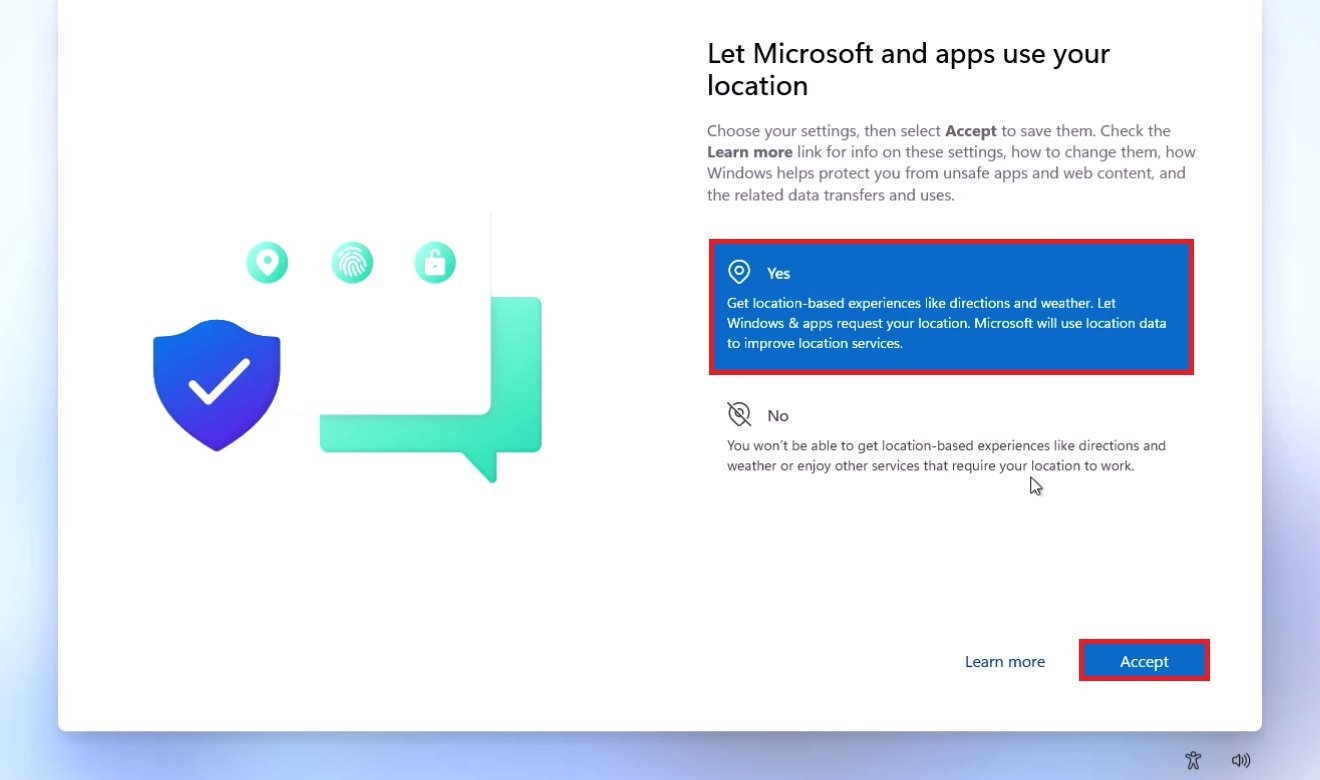
A series of toggles for location services, Find My Device, diagnostic data sent to Microsoft, tailored experiences based on diagnostic data, and personalized advertising ID. Review each one — none of them need to be turned on to finish setup, so set them according to your own preference, then select Accept.
Final setup and first desktop
Windows will spend a few minutes finishing up ("This might take several minutes," app configuration, etc.) before dropping you at the desktop for the first time. You may also be offered optional extras along the way (restoring from another PC, OneDrive backup, Microsoft 365, Game Pass, linking your phone) — each can be skipped.
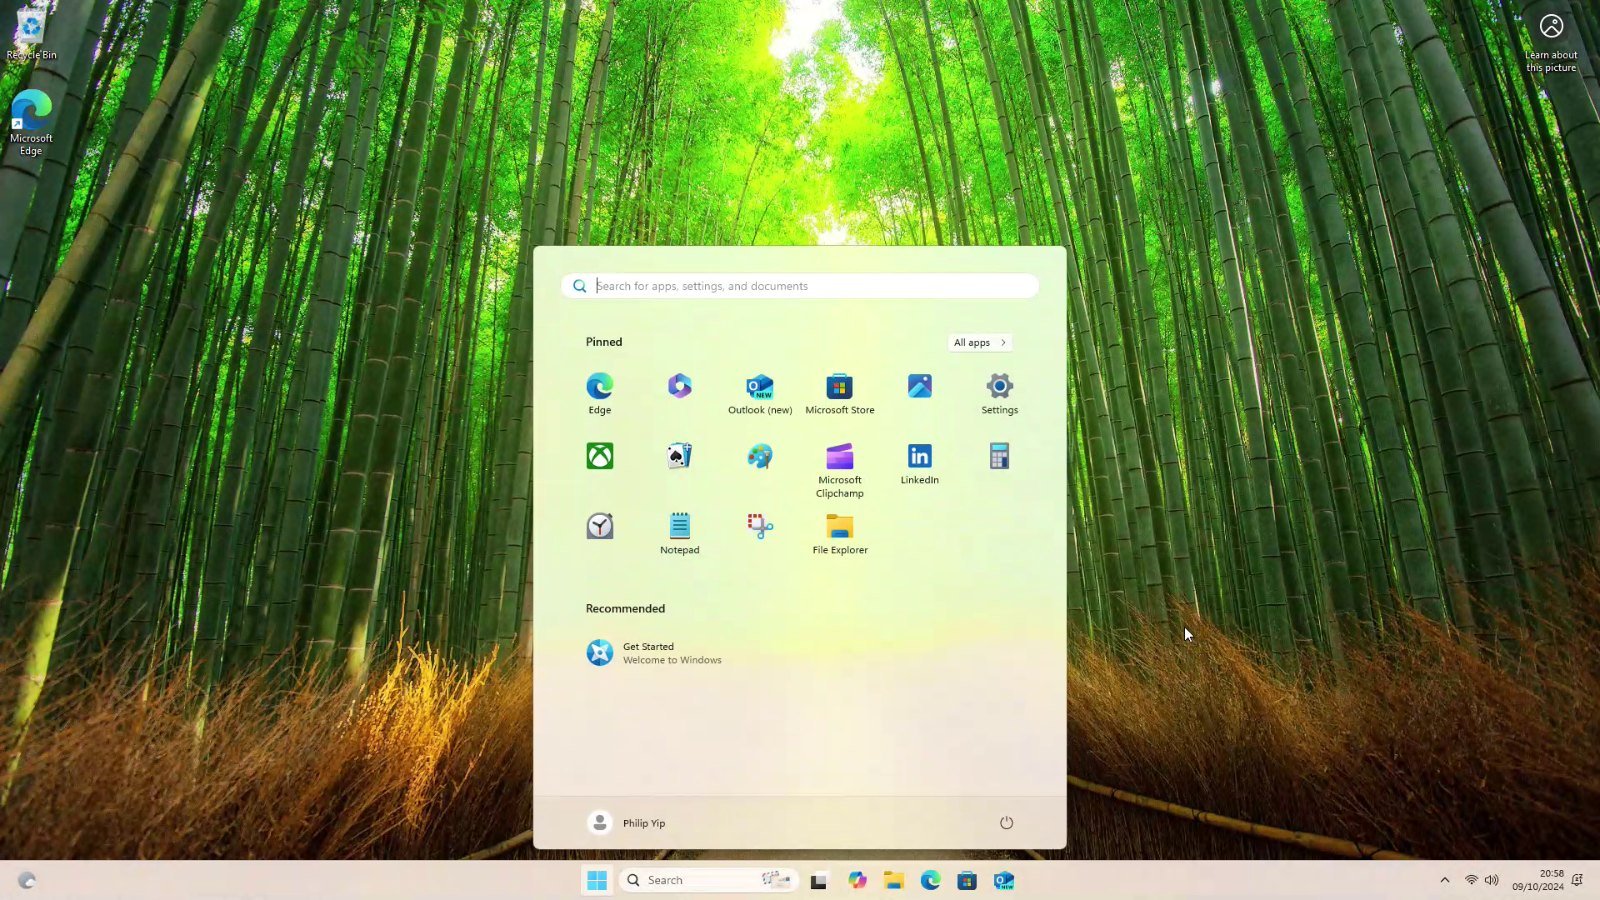
How to Verify Windows 11 Pro Was Installed Correctly
Once you reach the desktop, confirm the correct edition actually installed:
- Open Settings (Windows key + I).
- Go to System → About.
- Under "Windows specifications," check the Edition field.
It should read Windows 11 Pro. If it reads "Windows 11 Home" instead, see the edition scenarios section below — this is a fixable situation, not something that requires reinstalling from scratch in most cases.
How to Activate Windows 11 Pro
If you run into a Windows 11 Pro-specific activation error code, our product-specific activation troubleshooting for Windows 11 Pro covers additional edge cases beyond the general guidance below.
Installation vs. Edition vs. Activation vs. Product Key
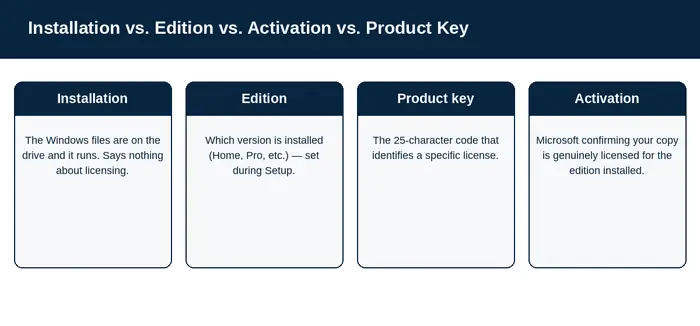
These four terms get mixed together a lot, so it's worth being precise:
- Installation — the files are on the drive and Windows runs. This doesn't say anything about licensing.
- Edition — which version of Windows is installed (Home, Pro, Enterprise, etc.), set during Setup as covered above.
- Product key — the 25-character code that identifies a specific license.
- Activation — Microsoft's servers confirming that your installation is genuinely licensed for the edition installed. Installing Windows 11 Pro does not automatically mean it's activated — an unactivated copy will show a watermark and some personalization features will be restricted until you activate it.
Check your activation status
- Go to Settings → System → Activation.
- This page tells you whether Windows is currently activated, and how (via digital license or product key).
Enter or change your product key
- On the Activation page, select Change product key.
- Enter your 25-character Windows 11 Pro key in the format `XXXXX-XXXXX-XXXXX-XXXXX-XXXXX`.
- Select Next and follow the prompts to complete activation.
Confirming "Active" status
Return to Settings → System → Activation — it should now show "Windows is activated with a digital license" or a similar confirmation. If it doesn't, see "Activation error after installation" in the troubleshooting section.
Common Edition Situations
Windows 11 Home got installed instead of Pro
This usually happens when the product key screen was skipped and the edition-selection screen either didn't appear or Home was selected by mistake. You don't necessarily need to reinstall — see the next section.
Upgrading an existing Windows 11 Home PC to Pro
If Windows 11 Home is already installed and working the way you want (files, apps, and settings in place), you can upgrade to Pro without reinstalling anything:
- Go to Settings → System → Activation.
- Select Change product key.
- Enter a genuine Windows 11 Pro key.
- Windows will validate the key, prompt for confirmation, and then upgrade the edition in place — this typically takes a few minutes and one restart, and your files, apps, and settings remain untouched.
Reinstalling Windows 11 Pro on a PC you've activated before
If this exact PC previously had an activated copy of Windows 11 Pro tied to it (via a digital license linked to your Microsoft account, or in some cases the hardware itself), reinstalling and signing back in with the same Microsoft account will often reactivate automatically once you're online — you may not need to re-enter a product key at all.
"I don't have a product key"
Selecting this during Setup lets you continue the installation and enter a key afterward, from Settings → System → Activation. Windows will run unactivated in the meantime, with some limitations, until you do.
Product key rejected / doesn't match edition
A genuine Windows 11 Pro key will be rejected if Windows 11 Home is what's currently installed — the key and the installed edition have to match, or you need to go through the Home-to-Pro upgrade path above rather than just typing the key in as if it were a fresh install. Double-check you're entering a Windows 11 Pro key specifically, not a Windows 10 or Windows 11 Home key.
Digital license vs. product key
A digital license (sometimes still called a "digital entitlement") is tied to your Microsoft account and your PC's hardware rather than a 25-character code you type in — once activated this way, reinstalling the same edition on the same hardware and signing in with the same Microsoft account typically reactivates it automatically. A product key is the 25-character code itself, which converts into a digital license the first time it's successfully activated online.
Reactivating after a hardware change
According to Microsoft's own documentation, if you've replaced significant hardware (most commonly the motherboard) and your digital license was linked to your Microsoft account before the change, you can generally use the Activation troubleshooter (Settings → System → Activation → Troubleshoot) to reactivate, selecting the option indicating you've made a hardware change. This is only documented to work reliably for licenses that were linked to a Microsoft account prior to the hardware change — we won't claim it works for every license type, since Microsoft's own guidance is specific about this condition.
After Installation: Windows Update
Windows 11 Pro rarely finishes installation fully up to date. Immediately after setup:
- Go to Settings → Windows Update.
- Select Check for updates.
- Install everything offered, restarting when prompted.
- Repeat — it's normal to need several rounds of "check, install, restart" before Windows Update reports you're fully current.
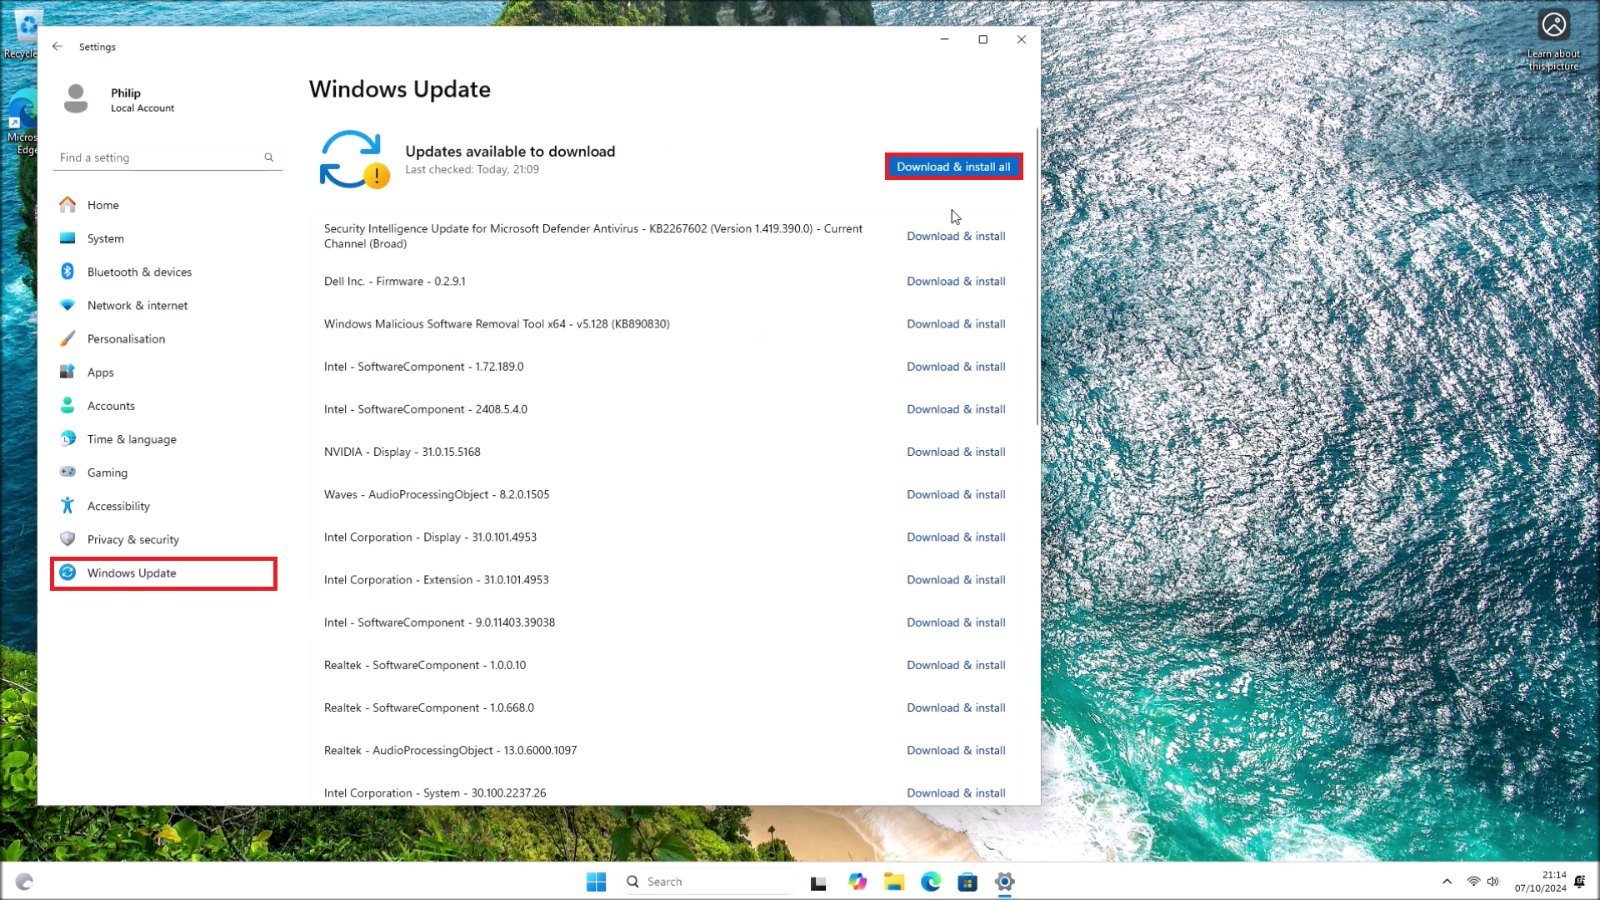
Optional driver updates sometimes appear here too, under "Optional updates" — these are worth reviewing but generally not urgent unless you're missing a specific piece of hardware functionality.
After Installation: Drivers
Letting Windows Update handle it first
Windows Update installs many common drivers automatically (graphics, network, chipset, and so on) as part of the update process above. For most modern, mainstream hardware, this is often enough.
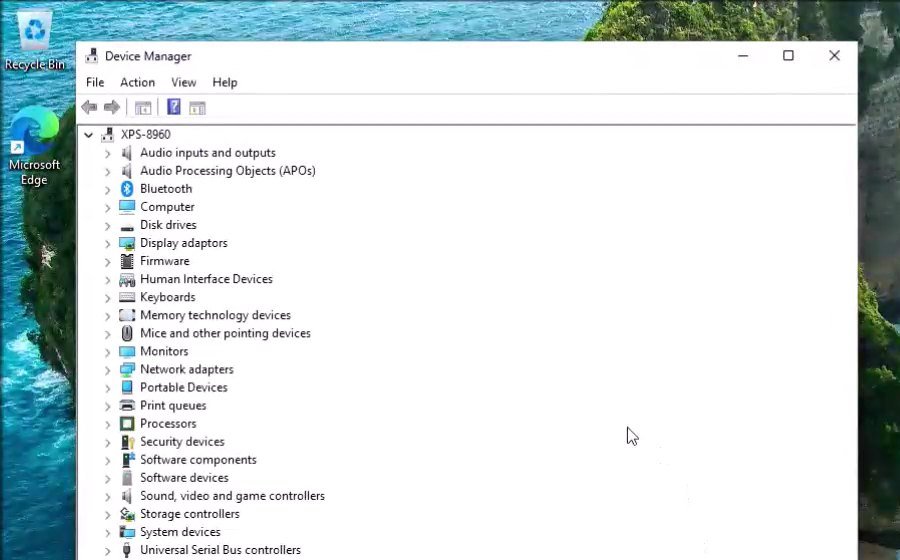
Checking Device Manager
- Right-click the Start button and select Device Manager.
- Look for any entry with a yellow warning triangle — this indicates Windows doesn't have a proper driver for that device.
Getting drivers from your PC manufacturer
For anything Windows Update doesn't resolve — particularly graphics cards, specialized audio hardware, or laptop-specific components (fingerprint readers, specialty touchpad drivers, etc.) — go to your PC or component manufacturer's official support/drivers page and download drivers matched to your exact model. This applies whether your PC is from Dell, HP, Lenovo, ASUS, or a custom build (in which case, check your motherboard and GPU manufacturers separately).
No Wi-Fi or network after a clean install? Prepare for this in advance
This is the single most common post-clean-install headache: some laptops and most custom-built desktops with certain Wi-Fi cards don't have a working network driver built into Windows 11's default install, leaving you with no way to get online to download one.
Prepare for this before you start, if you're not certain your PC will have working internet immediately after installation:
- If you have access to another working computer, download the Wi-Fi/network driver for your specific PC model from the manufacturer's site beforehand, and save it to a second USB drive.
- A wired Ethernet connection is far more likely to "just work" out of the box than Wi-Fi — if you have the option, use a cable for at least the first Windows Update pass.
Common Windows 11 Pro Installation Problems
"This PC can't run Windows 11"
This message from the Installation Assistant or PC Health Check means your PC fails one or more of the minimum requirements — most often TPM 2.0, Secure Boot, or CPU compatibility. Run PC Health Check to see exactly which requirement is failing, then check the TPM and Secure Boot items below, since those are the most commonly fixable causes.
TPM 2.0 not detected or not enabled
Many PCs from the last several years have a TPM 2.0-capable chip that's simply switched off by default. In your PC's UEFI/BIOS settings (usually opened with Del or F2 at startup, not the boot menu key), look for a setting called TPM, Security Device, fTPM (AMD systems), or PTT/Intel Platform Trust Technology (Intel systems), and enable it. The exact location varies by motherboard manufacturer — check their documentation if you can't find it.
Secure Boot isn't supported / can't be enabled
Secure Boot also lives in UEFI settings. It requires your drive to be formatted with a GPT partition table and your firmware to be running in UEFI mode rather than Legacy/CSM mode. If Secure Boot is grayed out, check whether your boot mode is set to Legacy or CSM and switch it to UEFI first.
USB drive doesn't show up in the boot menu
- Confirm the USB was created correctly (redo the Media Creation Tool steps if unsure).
- Try a different USB port — some older PCs don't reliably boot from USB 3.0 ports.
- Confirm the PC's boot mode (UEFI vs. Legacy) matches how the media was created — the Media Creation Tool and Rufus (with GPT selected) both default to UEFI-compatible media, which is correct for virtually all modern PCs.
Setup can't see your SSD/hard drive ("We couldn't find any drives")
This typically means Windows Setup doesn't have a storage driver for your drive controller — common with newer NVMe drives on older motherboards, or PCs with RAID/Intel RST (Rapid Storage Technology) mode enabled. On the drive selection screen, look for a Load driver button, and load the appropriate storage driver from your motherboard manufacturer's support page (downloaded onto a separate USB beforehand). Alternatively, check your UEFI settings for a storage mode setting (often labeled AHCI vs. RAID) and switch to AHCI if your setup doesn't specifically require RAID.
No internet or missing network adapter after installation
See "No Wi-Fi or network after a clean install" above — download the network driver from your manufacturer's site using another device, then install it via Device Manager (Update driver → Browse my computer for drivers).
Product key doesn't work
Confirm you're entering a genuine Windows 11 Pro key (not Windows 10, not Home) and that you haven't mistyped a character (0 vs. O, 1 vs. I are common mix-ups). If the key was purchased from MMKeys and still doesn't activate, contact our support team with your order details so we can help directly rather than guessing at causes here.
Windows 11 Home installed instead of Pro (again)
Covered above under "Common Edition Situations" — this is fixable via Settings → System → Activation → Change product key with a genuine Pro key, without reinstalling.
Setup keeps restarting back into the USB installer
This happens when the PC's boot order prioritizes the USB drive over the internal drive, so every automatic restart during installation reloads Setup instead of continuing. After the first restart, either remove the USB drive physically, or watch for a "Press any key to boot from USB" prompt and deliberately do nothing so it times out.
Can't select or use the installation drive
If the drive shows up but can't be selected, it may need to be initialized, converted to GPT (for UEFI installs), or it may contain leftover partitions from an incompatible previous setup (like an old MBR-based Windows installation). This is one of the more advanced scenarios — if you're not comfortable using Windows Setup's built-in disk tools (Shift+F10 opens a command prompt from within Setup, where advanced users use `diskpart`), it's worth getting help rather than guessing, since disk-partitioning mistakes are hard to undo.
Not enough disk space
Windows 11 requires 64 GB or more. If your target drive or partition is smaller, you'll need a larger drive, or you'll need to free up space by deleting other partitions on the same physical drive (only ones you're certain you don't need — see the partition warning earlier in this guide).
Activation error after installation
- Confirm you have an active internet connection.
- Double check the product key was typed correctly.
- Try Settings → System → Activation → Troubleshoot, which walks through several automatic fixes, including the hardware-change scenario covered above.
- If none of these resolve it and your key came from MMKeys, reach out to our support team.
Frequently Asked Questions
Quick answers to the questions readers ask most about installing Windows 11 Pro. For anything else, see our frequently asked questions page.
Can I install Windows 11 Pro without a product key?
Yes — select "I don't have a product key" during Setup, and enter it afterward from Settings → System → Activation. Windows will run unactivated until you do.
How do I install Windows 11 Pro from a USB drive?
Create bootable media with Microsoft's Media Creation Tool (covered in Step 2 above), then restart your PC, open the boot menu, and select the USB drive to begin Windows Setup.
How big does the USB need to be?
At least 8 GB. A larger drive works fine too, but nothing smaller will fit the installation files.
Does installing Windows 11 delete my files?
A clean install from a USB drive (the "Install Windows 11" option in Setup, which asks you to agree that everything will be deleted) erases the target drive, including personal files. An in-place upgrade (running the Installation Assistant, or setup.exe from inside Windows) is designed to keep your files, apps, and settings — but backing up before either is still good practice.
Can I upgrade Windows 11 Home to Pro?
Yes, without reinstalling — go to Settings → System → Activation → Change product key and enter a genuine Windows 11 Pro key. Windows upgrades the edition in place.
Do I need TPM 2.0 for Windows 11?
Yes, TPM 2.0 is part of Microsoft's official minimum requirements for Windows 11, including Pro. Many PCs have a TPM 2.0-capable chip that simply needs to be enabled in UEFI settings.
Can I install Windows 11 Pro without a Microsoft account?
The standard Windows 11 setup flow requires internet access and a Microsoft account to complete, for both Home and Pro. Windows 11 Pro does offer an official "Set up for an organization" path during setup intended for domain/Microsoft Entra ID-joined business devices, which uses a work or school account instead of a personal Microsoft account — but this is intended for managed/business deployments, not a general personal-use bypass.
How long does Windows 11 installation take?
Typically 20–45 minutes for the core installation, plus time to create your bootable USB (15–45 minutes depending on internet speed) and complete first-time setup (10–15 minutes). Budget an hour to ninety minutes overall.
Can I reinstall Windows 11 Pro on the same PC?
Yes. If the PC previously had an activated digital license tied to your Microsoft account, reinstalling and signing back in with the same account often reactivates it automatically once you're online.
Where do I enter my Windows 11 Pro product key?
Either during Setup, on the product key screen, or afterward from Settings → System → Activation → Change product key.
How do I know whether Windows 11 is activated?
Check Settings → System → Activation — it will clearly state whether Windows is activated and how (digital license or product key).
Why did Windows install Home instead of Pro?
Usually because the product key screen was skipped without an edition being explicitly selected on the edition-list screen, or a Home key was entered by mistake. Fix it via Settings → System → Activation → Change product key with a genuine Pro key — no reinstall needed.
What's the difference between Windows 11 Home and Pro?
Both install the same way and meet the same hardware requirements. Pro adds BitLocker encryption, Remote Desktop hosting, Hyper-V virtualization, Group Policy management, and domain/Microsoft Entra ID join capability — features aimed at business and power users.
Do I need to buy Windows 11 again when reinstalling it?
Not if you're reinstalling on the same PC that already had an activated digital license linked to your Microsoft account — it typically reactivates automatically. You would need a new license if you're installing on different/replacement hardware and your existing license doesn't cover that transfer, which depends on the specific license type you hold.
Where to Get a Genuine Windows 11 Pro Product Key
If you're starting this process without a license yet, MMKeys sells genuine Windows 11 Pro product keys with instant email delivery, so you can have a key in hand before you reach the activation step above. You can also browse our full range of Windows 11 licenses if you're comparing editions, or check our download and activation guides for other Microsoft products. If you hit a Windows 11 Pro-specific activation error code not covered in the troubleshooting section above, our product-specific activation guide covers a few additional edge cases, or you can check our FAQ.
Ready to install Windows 11 Pro?
Get a genuine Windows 11 Pro product key with instant email delivery.
Get Windows 11 Pro