How to Take a Screenshot on Windows 11: The Complete Guide (All Methods)
Meta Description: Learn how to take a screenshot on Windows 11 using every available method keyboard shortcuts, Snipping Tool, and more. Works with Windows 11 Pro, Windows 11 ISO installs, and all editions.
Whether you just completed a Windows 11 download, installed from a Windows 11 ISO, or upgraded using the Windows 11 Media Creation Tool, one of the first things you’ll want to master is how to capture your screen. Screenshots are essential for saving information, troubleshooting issues, sharing content, and documenting your work.
In this complete guide, we cover every method to take a screenshot on Windows 11 from simple one-key shortcuts to the powerful built-in Snipping Tool. This guide works for all editions, including Windows 11 Pro, Windows 11 Home, and Windows 11 Education.
Table of Contents
1. Method 1: Print Screen (PrtSc) Key
2. Method 2: Windows Key + Print Screen (Full Auto-Save)
3. Method 3: Alt + Print Screen (Active Window Only)
4. Method 4: Windows Key + Shift + S (Snipping Tool Shortcut)
5. Method 5: Snipping Tool App (Full Features)
6. Method 6: Xbox Game Bar (For Gamers)
7. Method 7: Third-Party Screenshot Tools
8. Where Are My Screenshots Saved?
9. Troubleshooting: Screenshot Not Working on Windows 11
10. FAQ
Why Screenshot Methods Matter on Windows 11
Windows 11 introduced a refreshed interface with a centered taskbar, rounded corners, and an overhauled Snipping Tool making it the most screenshot-friendly version of Windows yet. Whether you installed via a Windows 11 ISO download, activated with a Windows 11 key, or used the Windows 11 Media Creation Tool to set up your PC, the screenshot tools below apply universally across all setups.
Some users running the Windows 11 KB5077181 update have reported bugs affecting certain system functions including the Snipping Tool. We cover fixes for that in the troubleshooting section below.
Method 1: Print Screen (PrtSc) Key Copy to Clipboard
Best for: Quickly copying a screenshot to paste into an app like Word, Paint, or email.
This is the most basic way to take a screenshot on Windows 11. Here is how to do it:
Step 1: Navigate to the screen or window you want to capture.
Step 2: Press the PrtSc key on your keyboard. It may also appear as PrtScn, Print Scr, or Prt Sc depending on your keyboard model.
Step 3: The screenshot is now copied to your clipboard.
Step 4: Open any app that accepts images such as Microsoft Paint, Word, Outlook, or a chat window.
Step 5: Press Ctrl + V to paste the screenshot.
Step 6: Save the file in your preferred format such as PNG or JPEG.
Pro Tip: If the PrtSc key does not work, try pressing Fn + PrtSc on laptops where the function key is required to activate it.
Method 2: Windows Key + PrtSc Auto-Save Full Screenshot
Best for: Instantly saving a full-screen screenshot without any extra steps.
Step 1: Press the Windows Key and PrtSc at the same time.
Step 2: Your screen will briefly dim to confirm the screenshot was taken.
Step 3: The image is automatically saved as a PNG file on your computer.
Where is it saved? Your screenshot will be saved here: C:\Users\YourUsername\Pictures\Screenshots
This is the fastest method for saving screenshots directly to your hard drive without opening any app. It works perfectly whether you are on a fresh Windows 11 download, running Windows 11 Pro, or installed via the Windows 11 Media Creation Tool.
Method 3: Alt + Print Screen Capture the Active Window Only
Best for: Capturing just one open window instead of the entire screen.
Step 1: Click on the window you want to capture to make it active.
Step 2: Press Alt + PrtSc on your keyboard.
Step 3: The active window is copied to your clipboard.
Step 4: Open Paint, Word, or any image editor and press Ctrl + V to paste it.
This method is perfect when you have multiple windows open and only need to capture one specific window, such as a browser, a settings panel, or a dialog box.
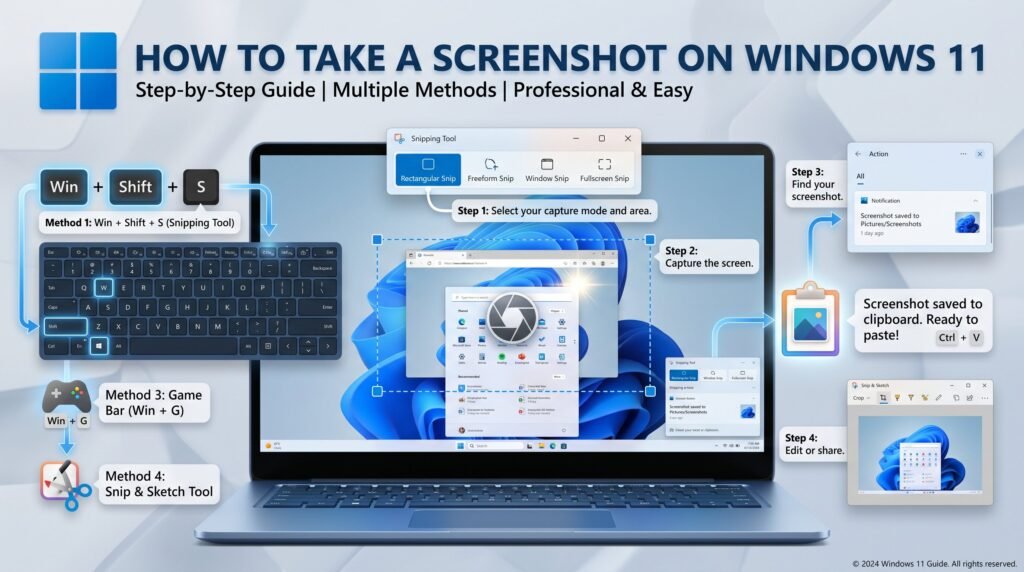
Method 4: Windows Key + Shift + S Snipping Tool Shortcut
Best for: Flexible, on-demand screen capture with multiple shape options. This is the most popular method among Windows 11 users.
Step 1: Press Windows Key + Shift + S at the same time.
Step 2: Your screen dims and a small toolbar appears at the top of the screen.
Step 3: Choose your snip type:
– Rectangular Snip: drag to select a rectangle. This is the most commonly used option.
– Freeform Snip: draw a custom shape around what you want to capture.
– Window Snip: click on a specific open window to capture it.
– Full-Screen Snip: capture the entire screen in one click.
Step 4: After taking your snip, a notification appears in the bottom-right corner of the screen.
Step 5: Click the notification to open and edit the screenshot in the Snipping Tool.
Step 6: Save or copy the image as needed.
Why this is the best method for most users: It works from any screen without interrupting what you are doing. It gives you editing options before saving. You can select exactly what you need without capturing the whole screen.
Method 5: Snipping Tool App Full-Featured Screenshot Tool
Windows 11 ships with a completely redesigned Snipping Tool that combines the old Snip and Sketch with the legacy Snipping Tool into one powerful app.
How to Open Snipping Tool:
Press the Start button, type Snipping Tool, and press Enter.
Features of the Windows 11 Snipping Tool:
– Delay capture: set a 1, 3, or 10 second delay before the capture activates. This is great for capturing menus or tooltips that disappear when you click.
– Annotation tools: includes a pen, highlighter, eraser, and ruler.
– Pin to screen: keep your screenshot visible on top of other windows.
– Screen recording: added in later Windows 11 updates, allowing you to record your screen directly from the app.
– Copy, Save, or Share directly from the app with one click.
How to Use Delayed Screenshot:
Step 1: Open Snipping Tool from the Start menu.
Step 2: Click the clock icon or go to the three-dot menu and select Capture delay.
Step 3: Set a delay such as 3 seconds.
Step 4: Click New and set up the screen you want to capture before the timer runs out.
Step 5: The Snipping Tool will activate and let you select the area to capture.
This is especially useful for capturing right-click context menus, hover tooltips, or dropdown menus that disappear when you click elsewhere.
Method 6: Xbox Game Bar Screenshot While Gaming
Best for: Taking screenshots while playing PC games on Windows 11.
The Xbox Game Bar is a built-in overlay in Windows 11 designed for gamers, but it also works in many regular apps.
Step 1: Press Windows Key + G to open the Xbox Game Bar.
Step 2: Click the Camera icon in the Capture widget, or press Windows Key + Alt + PrtSc.
Step 3: The screenshot is saved automatically.
Where are Game Bar screenshots saved? They are saved here: C:\Users\YourUsername\Videos\Captures
Tip: If the Xbox Game Bar does not open, go to Settings, then Gaming, then Xbox Game Bar, and make sure it is toggled On.
Method 7: Third-Party Screenshot Tools
While Windows 11 has excellent built-in tools, some power users prefer third-party software for advanced features like scrolling screenshots, cloud upload, or text extraction from images.
Top Third-Party Screenshot Apps for Windows 11:
Snagit Best for professional screenshots and screen recording. Paid software.
ShareX Best for advanced users. Free and open source with many automation features.
Lightshot Best for quick online sharing. Free.
Greenshot Lightweight and fast. Free.
Nimbus Screenshot Great for browser-based capture and cloud sync. Free and paid plans available.
All of these apps are fully compatible with Windows 11, Windows 11 Pro, and any installation whether you used a Windows 11 ISO, the Windows 11 Media Creation Tool, or a digital license linked to a Windows 11 key.
Where Are My Screenshots Saved on Windows 11?
This is one of the most common questions from new Windows 11 users. Here is a complete breakdown:
PrtSc key: Saves to clipboard only. Not saved to disk automatically.
Windows Key + PrtSc: Saved to Pictures then Screenshots folder.
Windows Key + Shift + S: Saved to clipboard. Saved to disk after editing in Snipping Tool.
Snipping Tool Save button: Saved to a custom location you choose.
Xbox Game Bar: Saved to Videos then Captures folder.
How to Change the Default Screenshot Folder:
Step 1: Go to C:\Users\YourUsername\Pictures\Screenshots
Step 2: Right-click the Screenshots folder and select Properties.
Step 3: Click the Location tab.
Step 4: Click Move and choose a new folder.
Step 5: Click Apply and confirm the change.
Troubleshooting: Screenshots Not Working on Windows 11
Some users especially those who installed the Windows 11 KB5077181 update have reported issues with screenshot functionality. Common problems include Snipping Tool crashes, blank screenshots, or the PrtSc key not responding. Here is how to fix the most common issues.
Problem 1: PrtSc Key Not Working
Try pressing Fn + PrtSc instead, especially on laptops.
Check if another app like Dropbox or OneDrive has taken over the PrtSc key in its settings.
Go to Settings, then Accessibility, then Keyboard, and make sure keyboard shortcuts are enabled.
Problem 2: Snipping Tool Not Opening After Windows 11 KB5077181 Update
Some users reported that after installing the KB5077181 cumulative update, the Snipping Tool would crash on launch or fail to capture anything.
Fix option 1: Open the Microsoft Store and check for a Snipping Tool update. Install any available updates.
Fix option 2: Uninstall and reinstall the Snipping Tool.
Open PowerShell as Administrator.
Run this command: Get-AppxPackage *SnippingTool* | Remove-AppxPackage
Then go to the Microsoft Store and reinstall Snipping Tool.
Fix option 3: If the problem persists, you can uninstall the KB5077181 update by going to Settings, then Windows Update, then Update History, then Uninstall Updates.
Problem 3: Screenshot Comes Out Black or Blank
Update your graphics driver through Device Manager.
Turn off Hardware-accelerated GPU scheduling by going to Settings, then System, then Display, then Graphics, then Default graphics settings.
Try a different screenshot method. For example, use Windows Key + Shift + S instead of PrtSc.
Problem 4: Win + PrtSc Not Saving to the Screenshots Folder
Check that the Screenshots folder exists at Pictures then Screenshots. If it does not exist, create it manually.
Make sure you have write permissions to the Pictures folder.
Check that you have enough free disk space on your drive.
Frequently Asked Questions
Does Windows 11 come with a screenshot tool built in?
Yes. Windows 11 includes the fully redesigned Snipping Tool, which supports rectangular, freeform, window, and full-screen captures. It also includes annotation tools and a built-in screen recorder added in later updates.
Do I need to download anything to take screenshots on Windows 11?
No. All screenshot methods in this guide are built into Windows 11. If you performed a fresh install using the Windows 11 ISO download or the Windows 11 Media Creation Tool, the Snipping Tool is included automatically with no extra steps needed.
Can I take a screenshot on Windows 11 without a keyboard?
Yes. Open the Snipping Tool from the Start menu and click the New button on screen. You can also use the Xbox Game Bar via on-screen controls by pressing Windows Key + G.
Does Windows 11 Pro have different screenshot features than Windows 11 Home?
No. The screenshot tools are identical across Windows 11 Home, Windows 11 Pro, and other editions. Your Windows 11 key or license type does not affect screenshot functionality in any way.
What format are Windows 11 screenshots saved in?
By default, screenshots saved with Windows Key + PrtSc are saved as PNG files. The Snipping Tool lets you choose to save as PNG, JPG, GIF, or MHT.
Where can I download Windows 11 if I need to reinstall?
You can download Windows 11 directly from the official Microsoft website. Microsoft offers the Windows 11 ISO for clean installs and the Windows 11 Media Creation Tool to create a bootable USB drive. Always download from the official Microsoft website to make sure you get a genuine copy. You will need a valid Windows 11 key to activate your installation.
Is the KB5077181 update safe to install?
The Windows 11 KB5077181 cumulative update is an official Microsoft security and quality update. While some users have reported minor bugs including Snipping Tool issues, most installations go smoothly. Keeping Windows updated is recommended for security reasons. If you experience bugs after installing it, check the Microsoft support page for that specific update or wait for a follow-up patch from Microsoft.
Quick Summary: Best Screenshot Method for Every Situation
Quick copy to paste into a chat or document: Use PrtSc
Save the full screen instantly without extra steps: Use Windows Key + PrtSc
Capture only one open window: Use Alt + PrtSc
Select a specific area of the screen: Use Windows Key + Shift + S
Add annotations or drawings before saving: Use the Snipping Tool App
Capture a disappearing menu or tooltip: Use Snipping Tool with Delay
Take a screenshot while gaming: Use Windows Key + Alt + PrtSc via Game Bar
Advanced features or cloud upload: Use ShareX or Snagit
Final Thoughts
Taking a screenshot on Windows 11 is easier than ever, thanks to the variety of built-in tools Microsoft has included. Whether you are a casual user who just did a Windows 11 download, a professional running Windows 11 Pro on a workstation, or a developer who installed via Windows 11 ISO, you now have every method available to you.
If you are setting up a new PC, remember to use the Windows 11 Media Creation Tool from the official Microsoft website for the smoothest installation experience, activate your copy with a valid Windows 11 key, and keep your system updated through Windows Update to avoid bugs like the ones reported with Windows 11 KB5077181.
Bookmark this guide and share it with anyone who is new to Windows 11. If you have any questions, drop them in the comments below.
Last updated: June 2026. Compatible with all Windows 11 versions including 23H2 and 24H2.